
In the following article and guide manual we will be focusing on what causes the irritating nvlddmkm.sys BSOD error and how you can fix it so it does not appear any more.
Blue Screen of Death (BSOD) crashes are not uncommon and there are very many different potential causes for them. The issue might be both with your hardware and your software and oftentimes it is difficult to determine where the problem actually lies. However, if the error message is something among the lines of display driver nvlddmkm.sys stopped responding and has successfully recovered and/or contains the following code 0x0000001E, then the cause for the crash is probably within your Nvidia driver. Most users report to receive the nvlddmkm.sys when trying to run some PC game. Sometimes, the crash might occur some time after the game has started and sometimes it will happen right after you’ve tried to launch it. Whatever the case, the method to fix the issue should be the same. In the following short guide we will show you the different steps that you need to execute in order to have the problem solved.
Nvlddmkm.sys BSOD Error in Win10/7 Fix
- First thing you need to do is download the latest Nvidia driver. Follow this link to the official Nvidia website. There you can download the exact driver update for your system. You can either manually search for it or let the website find the driver you need to download.
- Note that if you go for the automatic option, you’d need to first download and install a JAVA app, which will scan your system in order to determine which driver your system needs.
- Once you’ve downloaded the driver, install it by opening the executable file and following the prompts.
- Next, you’d need to go to C:\Windows\System32\Drivers and find a file named nvlddmkm.sys. Rename that file to nvlddmkm.sys.old.

- Now, go to the folder where the Nvidia driver was installed. It should usually either be C:\Nvidia or C:\drvvganVidia. Once there, find a file named nvlddmkm.sy_. Copy that file and paste it on your Desktop.
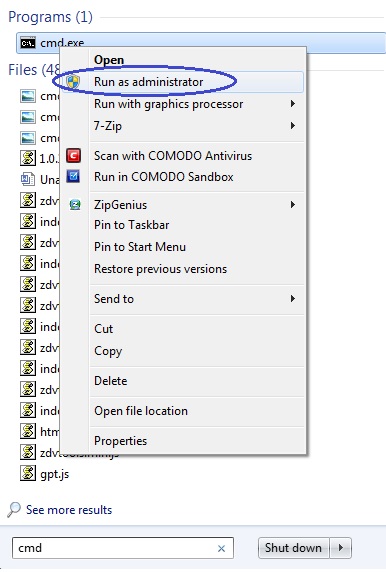
- Open your Start Menu and in the search bar type cmd.
- Right-click on the first result and select Open as Administrator.
- In the resulting window, type in the following command and hit Enter: chdir Desktop.
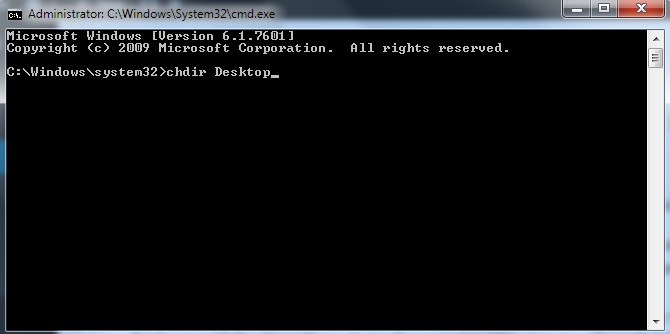
- After that, type in another command in the command prompt and hit Enter again: EXPAND.EXE nvlddmkm.sy_ nvlddmkm.sys.

- Now, a new file should be created on your Desktop named nvlddmkm.sys. Copy that file and paste it in the Drivers folder (C:\Windows\System32\Drivers).
- Restart your computer.
Your problem with the nvlddmkm.sys error should have been fixed and you should no longer receive the BSOD crash screen when trying to run a PC game.
Please let us know in the comment section below if our fix was able to to solve the issue for you. Have you found a better solution? Then please don’t hesitate to share it with us either, we will be happy to include your solution in our guide, so more users can benefit from it.