The “Sorry, something’s wrong with your Microsoft account” error message is a common issue that Xbox users sometimes face whenever they try to sign in their Xbox live accounts. If you are facing a similar problem, in this article, we will tell you how you may be able to fix this problem and successfully sign in your Xbox live account. Note that it is possible that instead of getting the “Sorry, something’s wrong with your Microsoft account” error message, you may simply be stuck at the sign-in loading screen. This is the same issue and requires the same steps to fix.
Account.live.com Fix Method 1:
Restart your Xbox
Even though this seems like a really simplistic fix, it could potentially work in a lot of cases where users cannot sign in their accounts. Simply turn off your Xbox and wait a couple of seconds. Then turn it back on and try to sign in again.
Account.live.com Fix Method 2:
Remove and re-add account
Disclaimer: Note that you must know your password and username prior to this step or else you may not be able to enter your account again.
The first thing you must do here is press the Xbox button on the controller to open the starting menu and then go to Settings > Settings > Remove Account.
Now, select the account that gives you the error when you try to access it and then confirm its removal. Removing the account won’t delete your account or delete any saved games, personalized settings, or achievements.
Once you remove the selected account, open the starting menu again and go to Sign in.
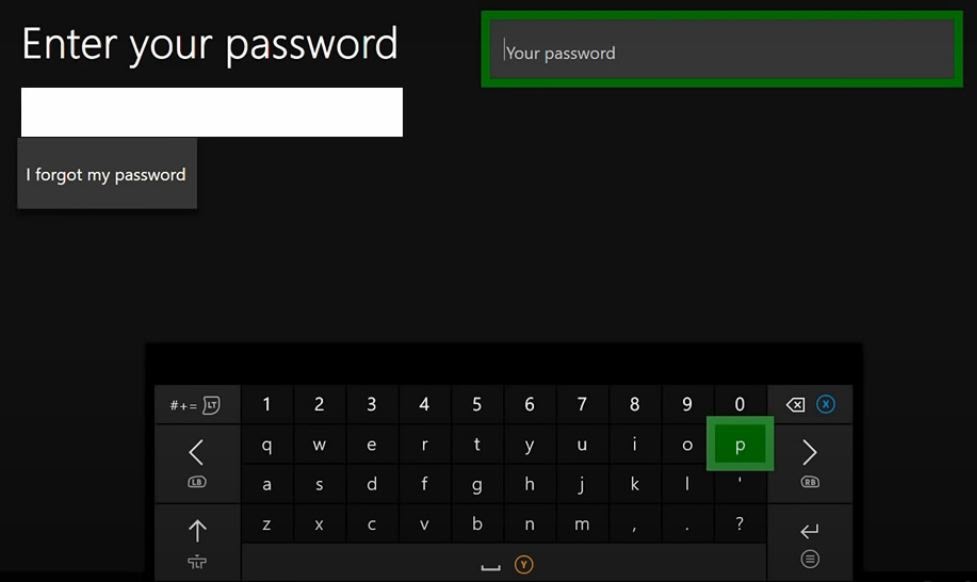
Next, select the Add new option and then type in the email/phone number/Skype username and the password of the account you are trying to access and then sign in.
You will be asked to customize your security preferences but you can skip this step by selecting the No Barriers option and go back to those settings later.
In most cases, this simple method should be enough to allow you to restore the access to your account.
Account.live.com Fix Method 3:
Verify your account information
In some cases, you may be required to verify some account information before you could enter your account again. Here’s how you can verify the information on your Xbox live account:
First, go tothis page and provide your email address and password to enter your account. Now check all account information – see if everything’s filled out with and that there’s no outdated info. This includes all phone numbers and emails connected to the account, as well as the security questions and answers.
Once you update your information, save the changes you’ve made and try to enter your Xbox live account. Note that if you have indeed made any changes by updating the information of your account, the changes will take place in 30 days. This is a security measure intended to prevent any potential attempts by hackers to steal your account.
The “Sorry, something’s wrong with your Microsoft account” error message is a common issue that Xbox users sometimes face whenever they try to sign in their Xbox live accounts. If you are facing a similar problem, in this article, we will tell you how you may be able to fix this problem and successfully sign in your Xbox live account. Note that it is possible that instead of getting the “Sorry, something’s wrong with your Microsoft account” error message, you may simply be stuck at the sign-in loading screen. This is the same issue and requires the same steps to fix.
Account.live.com Fix Method 1:
Restart your Xbox
Even though this seems like a really simplistic fix, it could potentially work in a lot of cases where users cannot sign in their accounts. Simply turn off your Xbox and wait a couple of seconds. Then turn it back on and try to sign in again.
Account.live.com Fix Method 2:
Remove and re-add account
Disclaimer: Note that you must know your password and username prior to this step or else you may not be able to enter your account again.
The first thing you must do here is press the Xbox button on the controller to open the starting menu and then go to Settings > Settings > Remove Account.
Now, select the account that gives you the error when you try to access it and then confirm its removal. Removing the account won’t delete your account or delete any saved games, personalized settings, or achievements.
Once you remove the selected account, open the starting menu again and go to Sign in.
Next, select the Add new option and then type in the email/phone number/Skype username and the password of the account you are trying to access and then sign in.
You will be asked to customize your security preferences but you can skip this step by selecting the No Barriers option and go back to those settings later.
In most cases, this simple method should be enough to allow you to restore the access to your account.
Account.live.com Fix Method 3:
Verify your account information
In some cases, you may be required to verify some account information before you could enter your account again. Here’s how you can verify the information on your Xbox live account:
First, go tothis page and provide your email address and password to enter your account. Now check all account information – see if everything’s filled out with and that there’s no outdated info. This includes all phone numbers and emails connected to the account, as well as the security questions and answers.
Once you update your information, save the changes you’ve made and try to enter your Xbox live account. Note that if you have indeed made any changes by updating the information of your account, the changes will take place in 30 days. This is a security measure intended to prevent any potential attempts by hackers to steal your account.
Cannot find a Valid Peer Process to Connect To – how to fix this?
The Cannot find a valid peer process to connect to Error
The users of Mac computers are occasionally reporting a “cannot find a valid peer process to connect to” error when they try to install VMware FUsion on MacOS High Sierra or a newer version. The issue typically occurs when the people are upgrading or resuming a Windows virtual machine. The most probable cause of the “Cannot find a valid peer process to connect to” on MacOS” error is related to some security changes that Apple has implemented to High Sierra. In case that you’ve tried to install VMware Fusion after these changes, the chance is that you might have missed out a prompt, which is telling you that some System Extension has been blocked because certain MacOs security systems have prevented them from running. In order to return the normal functionality of VMware Fusion, you will need to follow a series of steps. However, an installation glitch or a Gatekeeper that might have quarantined the extension may also be the cause for the blockage. That’s why below we have provided you with a couple of troubleshooting methods, that can prove effective in resolving the problem, depending on its particular cause.
Method 1: Allow VMware system software to load from the Security & Privacy menu
If you see the “cannot find a valid peer process to connect to” error when trying to start a virtual machine, it is possible that the security system has blocked the VMware system extension from running. To fix that, here is what you need to do:
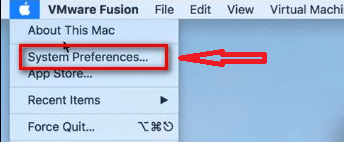
Select “System Preferences” from the Apple icon in the top-left corner.
Next, go to Apple icon > System Preferences
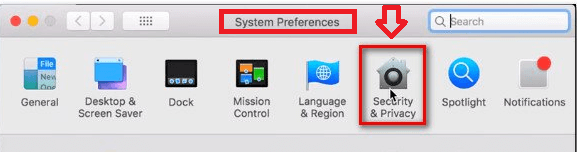
From theSystem Preferences menu, select Security & Privacy.
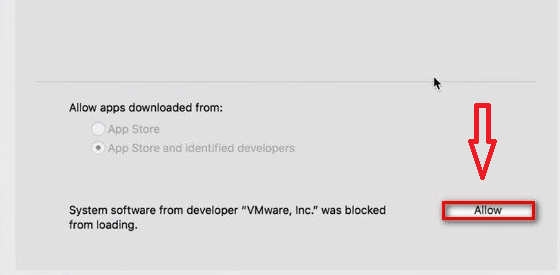
In the Security & Privacymenu, navigate to General tab and select the “Allow” button associated with VMware Inc.
Next, go to the VMware program and resume the virtual machine. You should no longer see the “cannot find a valid peer process to connect to”
If the “Allow” button is inactive, please see the next method.
Method 2: Set up the ”Anywhere” option in the Security & Privacy menu
In order to avoid the “cannot find a valid peer process to connect to” error when installing the VMware Fusion application , you can use the following steps to set up an “Anywhere” button:
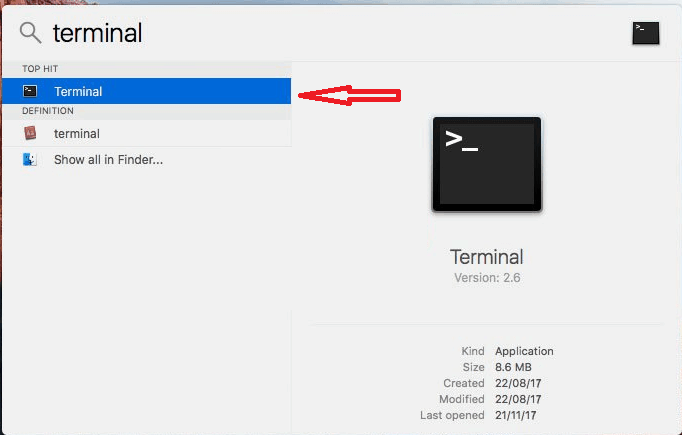
From the bottom-right corner use the “search” function and search for Terminal.
Next, select it from the “top hit” tab and press Enter.
In the terminal, type the following command and press Enter. This will set up the Anywhereoption in the Security & Privacy tab:
sudo spctl –master-disable
Once you run the command successfully, select the Appleicon in the top-left corner and navigate to System Preferences.
Next, click on Security & Privacy and go to the General tab. If the command was applied successfully, you will see the “Anywhere” option under “Allow apps to be downloaded from”. Select “Anywhere”.
Finally, run the VMware emulator again to see if the “cannot find a valid peer process to connect to” error is solved.
Method 3: Trigger the System Extension confirmation message to appear again.
In case that, after completing the Fusion installation, you cannot see the prompt, which is telling you that a System Extension has been blocked, here is how to trigger it to appear again:
First, ensure that Fusion is completely shut down.
Open the Finder app and in the list of applications, find VMware fusion.
Next, simply drag and drop the entry into a different folder. For simplicity, you can move it on the Desktop.
In order to continue, click Authenticate and then OK.
Once the file has been moved, move it back to the Application folder and start it again.
When you start the application, you should get the prompt, which is telling you that the System Extension has been blocked. When you see it, use the instructions in Method 1 to fix the issue.
Method 4: Remove the Fusion installation and remove the quarantine flags
Another possible reason that you aren’t able to install the Vmware Fusion Application is, the gatekeeper might have quarantined the downloaded installer. If this is the case, you can run a series of commands and allow the installation to complete by removing the quarantine flags.
Note: This method assumes that you have downloaded the installation .dmg file in the default folder.
Open the Terminal as shown on the picture
Copy and paste the following command in the Terminal application and press Enter:
Note: This command will fetch you a list with .dmg files extended attributes. Also, if you’re installing a newer version, replace the last part of the command with the exact name of the .dmg file.
To remove the quarantine flags for the installation file, copy and paste the following command:
Note: Don’t forget to replace the last part with the actual name of your .dmg file if you’re installing a newer version.
Once the command completes, re-run the installer. You should no longer see the “cannot find a valid peer process to connect to” when trying to complete the installation of VMware Fusion.
How to Use SFC /Scannow to Repair Windows System Files?
sfc /scannow is a command, which is available under the Command Prompt and is commonly used to inspect all of the important Windows files on a given computer, including Windows DLL files and other protected OS files. The role of the System File Checker(SFC) is to find if there is an issue with any of these protected files and to replace them if required. If you ever find yourself in need to repair important Windows files, here we have prepared a detailed guide, which will show you how to use the sfc /scannow command.
How to Use SFC /Scannow?
Open the Command Prompt as an administrator or as it is very often referred to – the “elevated” Command Prompt.
Note: Windows 10, Windows 8, Windows 7 and Windows Vista require the sfc /scannow command to be executed from an elevated Command prompt window to work properly.
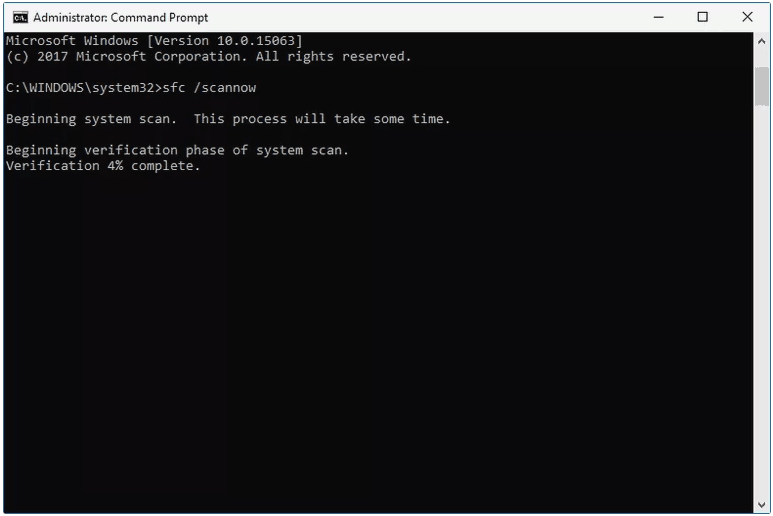
Once you open the Command Prompt, type the following command then press “Enter”.
sfc /scannow
Note: Between sfc and /scannow there is a space. Executing the sfc command without a space, as shown above, might result in an error.
If you are trying to use System File Checker from the Command Prompt available in Advanced Startup Options or System Recovery Options, see the Executing SFC /SCANNOW From Outside of Windows section below for some necessary changes in how you execute the command.
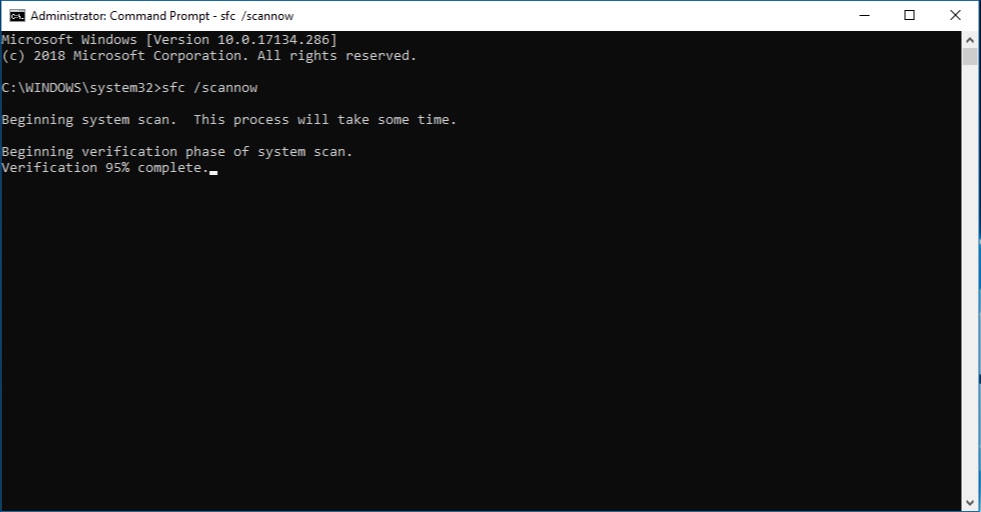
Next, wait for the System File Checker to verify the integrity of all the protected files on your system.
When the verification completes, the Command Prompt window will display a message similar to the one on the picture below, if some issues were found and repaired:
or something like this if no issues were found:
In older versions of Windows such as Windows XP or Windows 2000, you may need access to your original Windows installation CD or DVD at some point during SFC process.
Finally, restarts your computer and check if the sfc /scannow has corrected the issue that you were trying to repair.
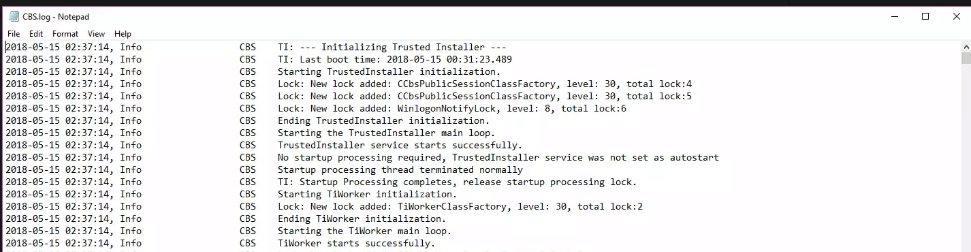
How to read the CBS.log File?
When you run System File Checker, it creates a LOG file, which contains a list of every file that has been checked and every repair operation that has taken place. Assuming that Windows is installed on the C: drive, then you can find the log file at C:\Windows\Logs\CBS\CBS.log and open it with Notepad or another text editor. The information there could be used for advanced troubleshooting of your problem or as a resource for the tech support team.
Executing SFC /SCANNOW From Outside of Windows
In case that you are trying to run the sfc /scannow from outside of Windows, (for instance, from the Command Prompt available when you boot from your Windows installation disc or flash drive), or from your System Repair Disc or Recovery Drive, you will have to specify where exactly Windows exists in order to run the command.
Here, the /offbootdir= option specifies the exact drive letter. The /offwindir= option specifies the Windows path, again including the drive letter.
Note: Keep in mind that when used from outside of Windows, the Command Prompt may not always assign the drive letters the way you see them from inside Windows. The C: drive may become D: in most installations of Windows 7 and above. That’s why make sure you check the letter of the drive where Windows is installed. Usually, that is the drive with the User folder on it.
How to Use SFC /Scannow to Repair Windows System Files?
sfc /scannow is a command, which is available under the Command Prompt and is commonly used to inspect all of the important Windows files on a given computer, including Windows DLL files and other protected OS files. The role of the System File Checker(SFC) is to find if there is an issue with any of these protected files and to replace them if required. If you ever find yourself in need to repair important Windows files, here we have prepared a detailed guide, which will show you how to use the sfc /scannow command.
How to Use SFC /Scannow?
Open the Command Prompt as an administrator or as it is very often referred to – the “elevated” Command Prompt.
Note: Windows 10, Windows 8, Windows 7 and Windows Vista require the sfc /scannow command to be executed from an elevated Command prompt window to work properly.
Once you open the Command Prompt, type the following command then press “Enter”.
sfc /scannow
Note: Between sfc and /scannow there is a space. Executing the sfc command without a space, as shown above, might result in an error.
If you are trying to use System File Checker from the Command Prompt available in Advanced Startup Options or System Recovery Options, see the Executing SFC /SCANNOW From Outside of Windows section below for some necessary changes in how you execute the command.
Next, wait for the System File Checker to verify the integrity of all the protected files on your system.
When the verification completes, the Command Prompt window will display a message similar to the one on the picture below, if some issues were found and repaired:
or something like this if no issues were found:
In older versions of Windows such as Windows XP or Windows 2000, you may need access to your original Windows installation CD or DVD at some point during SFC process.
Finally, restarts your computer and check if the sfc /scannow has corrected the issue that you were trying to repair.
How to read the CBS.log File?
When you run System File Checker, it creates a LOG file, which contains a list of every file that has been checked and every repair operation that has taken place. Assuming that Windows is installed on the C: drive, then you can find the log file at C:\Windows\Logs\CBS\CBS.log and open it with Notepad or another text editor. The information there could be used for advanced troubleshooting of your problem or as a resource for the tech support team.
Executing SFC /SCANNOW From Outside of Windows
In case that you are trying to run the sfc /scannow from outside of Windows, (for instance, from the Command Prompt available when you boot from your Windows installation disc or flash drive), or from your System Repair Disc or Recovery Drive, you will have to specify where exactly Windows exists in order to run the command.
Here, the /offbootdir= option specifies the exact drive letter. The /offwindir= option specifies the Windows path, again including the drive letter.
Note: Keep in mind that when used from outside of Windows, the Command Prompt may not always assign the drive letters the way you see them from inside Windows. The C: drive may become D: in most installations of Windows 7 and above. That’s why make sure you check the letter of the drive where Windows is installed. Usually, that is the drive with the User folder on it.
On this page, you will learn how to block emails that are unwanted or irritating from reaching your inbox. The article provides instructions on how to do this on all your devices which are using Gmail, Yahoo, Outlook, Hotmail and Apple Mail.
How to block emails
If you’ve been constantly bothered by dozens of unwanted email messages sent by specific individuals or different known and unknown organizations, you can easily block them. This won’t stop the spammers from sending you emails, but, at least, you won’t have to see those emails and deal with them again and again.
So, whether you want to block spam, junk mails, or maybe an aggressive salesperson or a friend who simply can’t stop sending you “adorable” picks and links, the fastest way to handle the unwanted emails is to put the sender’s email on a Block Senders list.
The different email service providers have different options for this, but, in general, it doesn’t take more than a few clicks. In fact, in the text below, we will show you exactly how to block the annoying senders on the most popular email service providers. So, if you are using Gmail, Outlook, Yahoo, Apple Mail or Hotmail, after you follow the instructions, you won’t have to worry about your overloaded inbox anymore.
How to block emails on Gmail
Gmail users can block specific email addresses in just a few seconds. Google’s Gmail platform has a pretty good spam filter and is pretty effective in blocking most of the unwanted messages.
However, if you want to block certain messages from specific senders, the instructions below will show you how to do that on both Gmail’s desktop and Android versions.
Block Emails on Gmail’s Web App
Firstly, we will explain to you how to block emails on Gmail through the web app. Here is a simple step-by-step guide to follow:
Next, find a recently sent email from the person or the organization you want to block.
Open the unwanted email.
Then, in the upper right corner navigate to the three vertical dots and click on the “More” option.
A dropdown menu will open where you will have to select “Block (the sender’s address)”. That’s it.
How to block emails on Gmail’s web app
Block Emails on Gmail’s Smartphone App
If you are on your smartphone and you are using the Android or the iOS app, then you can block unwanted emails on Gmail’s App by following the instructions below:
Open the Gmail app on your smart device.
Next, find a recently sent email from the person or the organization you want to block.
Open the unwanted email by tapping on it.
Next, navigate to the three vertical dots and select the email’s Moreoption. Here it is important not to confuse this option with the Gmail app’s “More” icon in the very upper right corner.
Select “Block (the sender’s address)”.
How to block emails on Gmail’s Smartphone App
How to block emails on Outlook
Outlook is the Microsoft’s Hotmail successor. If you are an Outlook user, there are a variety of ways to block senders in Outlook Mail and ban their unwanted messages from spamming your inbox. You can either block specific email addresses or automatically filter anything that looks like spam. Once blocked, the messages from the email address you no longer want to see will automatically be moved to the Junk Email folder.
Outlook has a web app, a smartphone app, and a desktop app and we will show you how to block emails on all three of them.
How to Block Emails on Outlook’s Web App
Here are the steps you need to follow to block an unwanted email address on the Outlook web app:
From your browser, navigate to outlook.live.com and log into your account.
Find a recently sent email from the person or the organization you want to block.
Open the email.
On the email window, click on the three horizontal dots in the upper right corner.
Then, from the menu that appears, select “Block (the sender’s address)”.
How to block emails on Outlook’s web app
How to Block Emails on Outlook’s Smartphone App
If you are using Android phone or iPhone, we should inform you that you cannot block senders directly from the Outlook smartphone app. Instead, what you can do if you don’t want to be disturbed by particular emails is to send them to your Spam folder. All the messages you direct to your Spam folder will go there in the future and you will not see them in your inbox.
Here is how to set the emails from a particular sender to go to Spam on the Outlook’s mobile app:
First, open the Outlook app on your smart device.
Next, find a recently sent email from the person or the organization you want to block.
Open the email.
In the upper right corner of the app’s window, tap on the three vertical dots. Here it is important not to confuse them with the vertical dots in the email window.
Then select “Move to spam”.
A quick tip: You can do the same by long-pressing on the email and then choosing the “More” icon in the top right corner.
How to Block Emails on Outlook’s Desktop App
If you are a Microsoft Office 365 subscriber or you’ve bought their license, then you have access to the Outlook desktop app. To block emails on the desktop app you need to follow these instructions:
First, open the Outlook desktop app on your computer.
Next, find an email from the person or the organization you want to block.
Then, right-click on the email.
From the menu that opens, navigate to Junk > Block Sender.
How to block emails on iPhone
In this section, we will teach you how to block an email address on your iPhone, iPad or Mac.
There are many reasons to block an email sender and, sometimes, this may be the only solution to messages from pesky scammers or third-parties who keep sending you irrelevant press and spam. Naturally, Apple has a number of ways to block people from sending junk to your email’s inbox.
How to block an email on Apple Mail
If you are a Mac, iPhone or iPad user, and you want to block someone in the Apple Mail app, you should know that the Apple Mail app on the iPhone does not have a direct option to block people from sending you email.
However, you can do this manually from each individual email service you are using. So to block a sender, the best way is to log into the email service provider’s website (Gmail, Outlook, Hotmail, Yahoo, etc.) using a web browser or request the desktop site if using an iPhone, and block the sender from there. For reference, feel free to use the instructions on this page for each email provider.
To block a sender in iCloud, you will have to create a “rule”. For that, you’ll need to either use the Mail app on Mac or log directly into iCloud’s web version.
Here is what you need to do to block a sender in iCloud and move its messages to trash:
First, open the Safari Browser and type the following address in the address bar https://www.icloud.com/#mail. If required, login with your Apple ID and password.
If you are doing this through your iPhone you should know that the iCloud’s mobile version does not have a blocking option. Therefore, you’ll need to request the desktop site by tapping and holdding the refresh button in the web address bar at the top of the screen. The moment the menu appears, select “Request Desktop Site”. Refresh the page and make sure you see the desktop version on your iPhone.
Next, open a recently received email from the person or the organization you want to block.
Then, at the bottom left corner of the screen, select the “Gear” icon.
How to block emails on iCloud step 4
A window will appear where you will need to select the “Rules” tab and then tap “Add a Rule…”. Here you need to create a rule to block a sender in iCloud if you want to send their email to the trash.
How to block emails on iCloud step 5
Set a rule so that if an email message “is from” the person/organization you want to block, then “Move to Trash”.
How to block emails on iCloud step 6
Click “Done”.
NB: If you are facing issues while using the desktop website version on your iPhone, try logging in from a desktop browser on a Mac.
How to block emails on Yahoo
If you are a Yahoo user, Yahoo provides a way to block emails from specific senders and you should take advantage of it. Learn how to automatically block unwanted messages in Yahoo Mail with the step-by-step guide below.
Yahoo is among the most popular email providers and offers both a Yahoo web app and a Yahoo smartphone mail app.
Here is how to Block Emails on Yahoo’s Web App
To block a sender on Yahoo through the web app, follow these instructions:
Next, find a recently sent email from the person or the organization you want to block.
Open the email.
In the top right of the email window click on the three horizontal dots.
A dropdown menu will appear where you will need to select “BlockSenders”.How to block emails on Yahoo Web App
6. A pop-up window will appear where you need to confirm your settings.
How to block emails on Yahoo Web App step 6
How to Block Emails on Yahoo’ Smartphone Mail App
You cannot block a sender on the Yahoo Mail app directly, but you can send the unwanted emails to your Spam folder.
If you want to send all future emails from a specific email address to your Spam folder on the Yahoo Mail app automatically, follow these instructions:
First, open the Yahoo Mail app on your smart device.
Find a recently received email from the person or the organization you want to block.
Open the email.
Next, tap on the right vertical dots on the right side of the screen.
Finally, from the dropdown menu select “Spam”.
How to block emails on Hotmail
NB: Hotmail.com has been upgraded and re-branded to Outlook.com.
Like most other popular email providers, Hotmail has settings that allow you to mark messages as spam. Those messages get filtered directly into your Spam Email Box. This section of the article will provide you with instructions on how to block emails on Hotmail (now known as Outlook).
Basically, Hotmail allows you to manage your inbox content by adding or deleting email addresses on the Blocked Senders’ list.
The process of blocking a sender on Hotmail is simple and here are the instructions for it:
Log into your Hotmail account.
Next, click the “Options” menu in the top right of the screen.
Then, select “More Options”.
Choose “Safe and Blocked Senders”.
Then “Blocked Senders”.
Finally, type the email address of the person or the organization you want to block.
Final words
Unwanted emails shouldn’t get in the way and create chaos in your inbox. However, sometimes spam messages may find their way through the filters and in those cases, you may need to manually block someone from messaging you by adding them in the Block senders’ list.
Blocking certain emails may also be a good preventive measure against email distributed threats such as Ransomware or Trojans. Therefore, do not hesitate to use the instructions above and clean your Gmail, Outlook, Hotmail, Apple Mail and Yahoo from unwanted spam.
My Quick Converter is a program that can easily invade your Chrome, Firefox or Internet Explorer. It usually places a new toolbar, homepage or search engine on your default browser, which gives you access to certain sponsored content such as ads, sales offers, hot deals and related websites. (You can find our removal guide at the end of the article). In a way, this program may seem useful, especially to those users, who enjoy being offered sales ads, promotional banners, and pop-ups. However, many people find the above-described browser modifications and ads aggressive. Our “How to remove” team has recently received a lot of complaints, related to unauthorized search redirects and never-ending ad streams, caused by this program. Meanwhile, security experts warn that My Quick Converter may be categorized as a potentially unwanted program (PUP) from the browser hijacking type. If you’ve noticed that your homepage and search engine have been changed and the reason for that is My Quick Converter, it’s a clear sign that your browser might have been hijacked. Fortunately, browser hijacking is not a malicious action and you can easily deal with it without professional assistance. So, if you landed on this page to learn how to remove My Quick Converter from your browser, we suggest you uninstall it with the help of the removal guide below.
My Quick Converter
My Quick Converter is being criticized for its intrusive browser changes and safety issues!
Browser hijackers are pieces of software, which often get criticized and even get mistaken for viruses. The reason is, they usually use a rather aggressive online advertising approach, which prompts users to click on various pop-up messages, new tabs, banners and sponsored sites. However, despite being categorized as aggressive, these pieces of software are not malicious. They do not attempt to cause harm to the users’ system, nor do they have harmful scripts. A lot of users get worried about the presence of programs like My Quick Converter in their browsers, but for their relief, we can firmly say that such programs do not initiate destructive actions similar to what a real virus (Trojan horse, Ransomware, Spyware, etc.) may run.
Still, if we have to advise our readers on what to do with a browser hijacker if it gets installed in their system, we would recommend them to have it uninstalled. The reason is such software may accidentally engage them in suspicious activity with the intention of promoting third-party web pages, raising their page rank, or receiving financial revenue through advertising. In addition, users may notice a new toolbar at the top of their browser’s menu or some unauthorized replacements of the homepage or the search engine. If this happens to you, you should be ready for permanent redirects to third-party web pages and exposure to various intrusive commercials. We do not need to say that these problems with the re-routing of My Quick Converter may become very annoying at some point. In addition, there is a risk of being redirected to Web pages that may not really be legitimate.
Unfortunately, the creators of browser hijackers usually disclaim responsibility for the inappropriate content you may be exposed to after clicking on any of the sponsored links, generated by their software. This means that you are solely responsible for the potential security risks and damages that might arise from clicking on the suggested content, which may not only be misleading but may also end you up with a nasty Trojan horse or a tricky Ransomware virus. With that in mind, you can decide for yourself if you need a program like My Quick Converter on your PC. If you decide to get rid of it, you will find instructions for removing the hijacker in the guide below.
How to stay safe from browser hijackers?
Many browser hijacking programs may have their official web page with an active download link. Therefore, users can download them directly from there. Undoubtedly, there is nothing wrong with this distribution method. But the creators of such ad-generating software also rely on another method known as software bundling, which allows installation on computers without the users’ knowledge. That’s why, to avoid being hijacked, you should be very careful when installing software bundles, especially setups that are distributed for free. These installers usually contain a main program, grouped with additional or recommended components, ready for installation. So, when you run the installer, they automatically become part of your system. To prevent that, instead of Quick or Basic settings, it is important to choose Advanced or Custom ones and check everything carefully. If you see an “I agree to set My Quick Converter as a default search engine” or “I agree to install the My Quick Converter Toolbar”, simply uncheck the checkboxes. This will disable the installation of the additional software and will protect you from all the above-mentioned browser hijacking problems.
Use the Winkey+R keyboard combination, write Control Panel in the search field and hit enter.
Go to Uninstall a program under Programs.
Seek the unwanted software, select it and then click on Uninstall
If you are unable to spot Hbpix “Virus”, search for any unrecognized programs that you do not remember installing on your PC – the unwanted software might disguise itself by going under a different name.
III – Cleaning all your browsers
Go to your browser’s icon, right-click on it and select Properties.
Go to the Shortcut tab and in the Target make sure to delete anything written after “.exe”.
Now, open your browser and follow the instructions below depending on whether you are using Chrome, Mozilla or IE.
Chrome users:
Go to your browser’s main menu located in the top-right corner of the screen and select Settings.
Scroll down, click on Show Advanced Settings and then select Clear browsing data. Just to be sure, tick everything and clear the data.
Now, in the left pane, go to Extensions and look through all extensions that are integrated within your browser. If you notice any suspicious add-on, disable it and then remove it.
Firefox users:
Similarly to Chrome, go to the main menu and select Add-ons and then Extensions.
Remove any suspicious browser extensions that you may have even if they do not have the name Hbpix “Virus” on them.
IE users:
Go to Tools and select Manage add-ons.
Click on all add-on types from the left pane and check if there is anything suspicious in the right panel. In case you find anything shade, make sure to remove it.
IV – Removing Shady processes
[bannerMiddleSecond]
Go to your start menu, type Task Manager in the search field and from the results open View running processes with Task Manager.
Thoroughly look through all processes. The name Hbpix “Virus” might not be there, but if you notice any shady looking process that consumes high amounts of memory it might be ran by the unwanted program.
If you spot the process ran by Hbpix “Virus”, right-click on it, open its file location and delete everything in there. Then go back to the Task Manager and end the process.
V – DNS check
In the start menu search box write View Network Connections and open the first result.
Right-click on the network connection you are using and go to Properties.
Select Internet Protocol Version (TCP/IPv4) and click on Properties.
If Obtain DNS server addresses automatically is not checked, check it.
Go to Advanced and select the DNS If there is anything in the DNS server addresses field, remove it and click OK.
Browser hijackers can often be a real pain in the neck, especially when they infect your Android phone, tablet or other portable device. They tend to, among other things, affect your Chrome or Firefox browser and change its default search engine and homepage. Furthermore, they also start filling it with various online ads, such as popups and banners, and redirect you to pages you never wanted to open. One of the latest programs of this type is Get-Today.com Pop-up “Virus” and we’re guessing that it’s also why you’ve landed on this page. Read on and find out just what this program is up to on your device and how you can remove it.
What is Get-Today.com Pop-up “Virus” after?
Browser hijackers generally serve the online marketing industry and in doing so they are primarily designed to promote various products and services. That is why you see all those many ads all the time. But at the same time, they also make sure their developers profit by means of various remunerations models, such as the Pay Per Click scheme. These systems usually convert the clicks or taps of users such as yourself on the said ads into profit for the hijacker developers. With that in mind, you can see how vested they must be in generating more and more aggressive ads.
In addition to that, hijackers like Get-Today.com Pop-up “Virus” often also take the liberty of exploring your browsing history and extracting valuable marketing information from it. For example, they can analyze your latest search requests and the websites you spend the most time on to determine the type of content you are more interested in. Then they can adjust the advertising campaign accordingly, and potentially make a bigger profit. This is often partly why programs like Get-Today.com Pop-up “Virus” are often considered to be potentially unwanted.
But that’s not to say that they are viruses or malware of any kind. Hijackers do not possess any harmful traits like ransomware or Trojans do. Nevertheless, they still have the potential of exposing you to such threats, which is a good enough reason to get rid of Get-Today.com Pop-up “Virus” as soon as possible. You can do that with the help of the removal guide we have prepared for you below. And from now on we recommend you first research any apps you would like to download onto your device before actually doing so. Browser hijackers like this one come integrated with various free apps and that way you will have a better chance of knowing if a given program contains a hijacker in it.
Get-Today.com Pop-up “Virus” Removal
STEP 1
Regardless of the type of browser you are currently using, be it the default “Internet” App or another one, such as Google Chrome, head over to: Settings/More/Application Manager/All
Find the Browser or the App you’re using and tap on it.
STEP 2
Here you will basically be doing the same thing if you’re using the “Internet” App, or a different browser of your choice, such as Chrome or others. However, below are instructions for both cases:
For user of the “Internet” App:
Tap the Force Stop button.
Move down and tap the Clear Data and Clear Cache Buttons.
For Google Chrome Users:
Tap on Force Stop.
Then tap on the buttons labelled as Clear Data and Clear Cache.
STEP 3
Restart your browser. You might want to consider rebooting your Android device, as well.
Were we able to help? Please help us, too, and spread the word!
Browser hijackers can be the most annoying thing ever, especially when one finds its way on your android smartphone or tablet. Today we’re discussing a certain browser hijacker called Com.master.wallet Android Virus. It’s one of the newest versions of this type of software, but the symptoms are the same with pretty much any other variant: a changed homepage and possibly also search engine within your default browser, as well as numerous online ads, both within your browser and potentially also outside it. In the following few lines we will aim to explain what purpose Com.master.wallet Android Virus serves and what concerns you ought to have with it. In addition, at the end of it all we will show you how to remove this browser hijacker from your portable device.
What does Com.master.wallet Android Virus do and why is it on your phone/tablet?
Programs of this type are used as online marketing tools with the intention of promoting certain products and services by means of displaying popups, banners, new tabs and other online ads on the screen of your device. On the one hand, the distributors of the products and providers of the advertised services benefit from gaining more exposure. But on the other, the developers of programs like Com.master.wallet Android Virus benefit just as much, in fact – directly from the users’ interaction with the ads on their screens. This is possible through methods like the Pay Per Click scheme and other similar remuneration models.
Unfortunately, however, those tend to breed certain practices that many users and security experts alike disagree with. For one, browser hijackers like this one can often look through your browsing history to extract certain data from it, like the kind of content you tend to like and share on social media platforms, for example. They can also record the websites you visit and take special note of those you spend the most time on and/or favorite. All of this data can allow the hijacker to modify its flow of ads and try to relate to your preferences.
This, as well as the fact that programs of this type have the potential of exposing your device to various threats, like ransomware and Trojan horse viruses, is often the underlying reasons why people prefer to get rid of programs like Com.master.wallet Android Virus. And once you’ve done the same, you might want to research the apps you would like to download from now on. Browser hijackers come integrated with them, so it’s best to know beforehand if a certain app has a hijacker in it.
Com.master.wallet Android Virus Removal
STEP 1
Regardless of the type of browser you are currently using, be it the default “Internet” App or another one, such as Google Chrome, head over to: Settings/More/Application Manager/All
Find the Browser or the App you’re using and tap on it.
STEP 2
Here you will basically be doing the same thing if you’re using the “Internet” App, or a different browser of your choice, such as Chrome or others. However, below are instructions for both cases:
For user of the “Internet” App:
Tap the Force Stop button.
Move down and tap the Clear Data and Clear Cache Buttons.
For Google Chrome Users:
Tap on Force Stop.
Then tap on the buttons labelled as Clear Data and Clear Cache.
STEP 3
Restart your browser. You might want to consider rebooting your Android device, as well.
Were we able to help? Please help us, too, and spread the word!