The following guide is designed to provide a fix for the “Unknowns device” error that appears in the Device Manager. The fixes in the guide will work for all Windows versions.
Lately there have been many reports of errors related to “unknown device”. The message for the unrecognized device pops up in the Device manager. This is the tool responsible for identifying all the connected hardware. It is also the component that manages the drivers installed on your PC – it updates them and installs them, this tool even removes them. What’s more, it enables and disables particular devices upon your request at any given time. The article below is focused on solving this problem and applies to all versions of Windows.
Possible origin of the issue
Sometimes when you connect a device to your computer, a notification saying that this device is unknown appears on your monitor in the Device Manager. If you notice a yellow exclamation mark in front of the device name, it means that your operating system is unable to identify a given device or it is unable to detect the necessary driver for it. In most of the cases, a device that is regarded as unknown is totally useless.

Fortunately, this issue can be solved by manually looking for and installing the driver for the unrecognized device. Usually after doing that, you will be able to use the device and the error notification will no longer pop up.
How To Fix “Unknown Device” Error in Windows 7/10
Potential solution: the device driver could be found using the Hardware ID
Load the Device Manager by hitting the Windows key on your keyboard and writing Device Manager. Then you have to open the displayed result of your search request. Usually, a list of all the devices connected to your computer will be generated. There you will see yellow exclamation marks marking the Unknown Device(s).

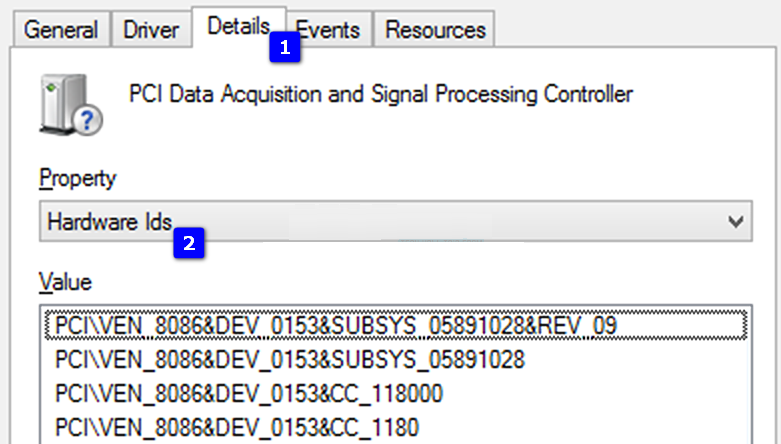
As soon as you have detected the device that Windows refuses to recognize, right-click on it. A dropdown menu will appear. Go with Properties from there. Choose the Details tab in the window that is displayed. After that, go to Hardware Ids from the Property menu.
The value that is put first is the Hardware ID of the device that you are trying to connect to your PC. Mark the ID and copy it. What you should do then is to search for it using its name online. Every piece of hardware has a unique hardware ID. It is normally used by the producer for identifying a particular device in the contemporary ocean of hardware. Luckily, you can do the same yourself and find the device you are looking for. The result of the online search should contain your device and its manufacturer. From the device producer’s web page you can download the right driver for your particular OS.
Once you have downloaded the necessary driver(s), go to your Downloads Directory. There you will see the setup file that you need and you can start installing it. Follow all the steps of the installation wizard closely.

As soon as you have finished the installation process, restart your machine in order to let it accept the changes you have made. After doing that, your device should have become functional and no error should appear.
A message in the Device Manager stating that a device you would like to use has not been recognized could really bother you. However, usually this issue is not serious or troubling. In some cases simply rebooting your system might help. Sometimes you have to install the needed device drivers yourself, which is more likely to resolve the error. Our advice is to perform the steps above to fix your problem. In case they do not work in your case, please, write to us and we will look for a way to personally help you. If you have found a different, but working solution yourself, don’t hesitate to share it with us. We will be glad to include it in our article and help even more struggling users. We hope you will find the article and the guide attached to it helpful and detailed enough.
