How to Create a System Restore Point for Windows

The following guide will teach you how you to create a restore point for Windows 7,8 and 10. We’ll also teach you how to use the system restore point to rollback Windows should any problems occur.

How to Create a System Restore Point

Creating a system restore point is a very good idea, especially if you are about to uninstall programs or try various fixes. Sometimes even a minor mistake can cause a lot of headaches and creating a system restore point is the fastest and easiest way to deal with any such issues. Also included belo0w are the instructions on how to use the restore point should the need arise.

  • Please note that System Restore point will only rollback your computer to the state in which the system restore point was made. That is why it is a good idea to make another restore point once you are done fixing all issues with your computer. Additionally, you can also set Windows to automatically create a restore point after set amonts of time. More on that below.
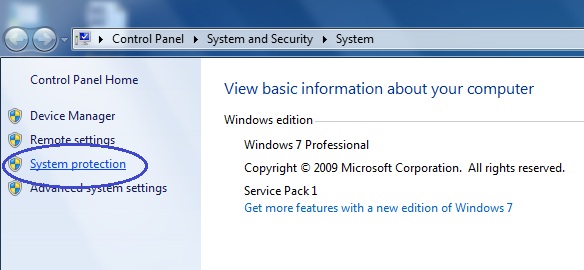
  1. Right-click on your My Computer icon and select Properties.1
  2. From the left panel, choose System Protection.2
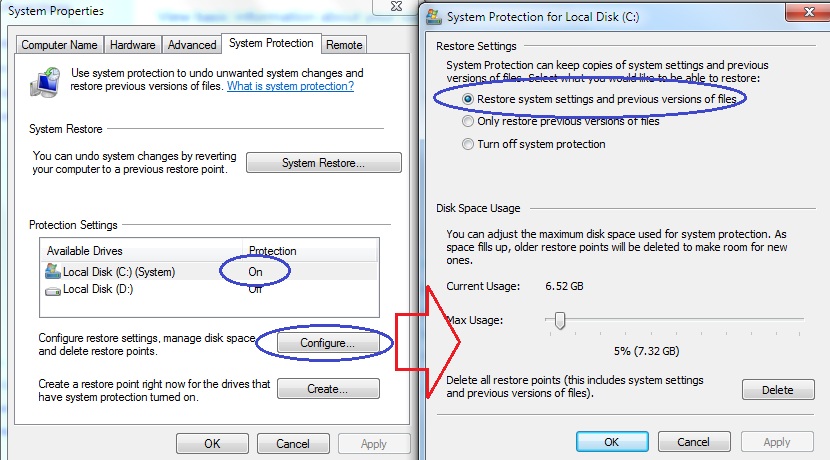
  3. Choose a device from the list and make sure that its Protection setting is turned on.
    • If the Protection is off (which is usually the case with Windows 10), turn it on by selecting the device and clicking on Configure. In the resulting window check Restore system settings and previous versions of files and after that click on OK.5
  4. Click on Create and in the resulting text field type in the name of the Restore point you’re about to create and then select Create.

3

  • You can also set your computer to automatically create restore points through the Task Scheduler. Here is a short guide on how to do that:
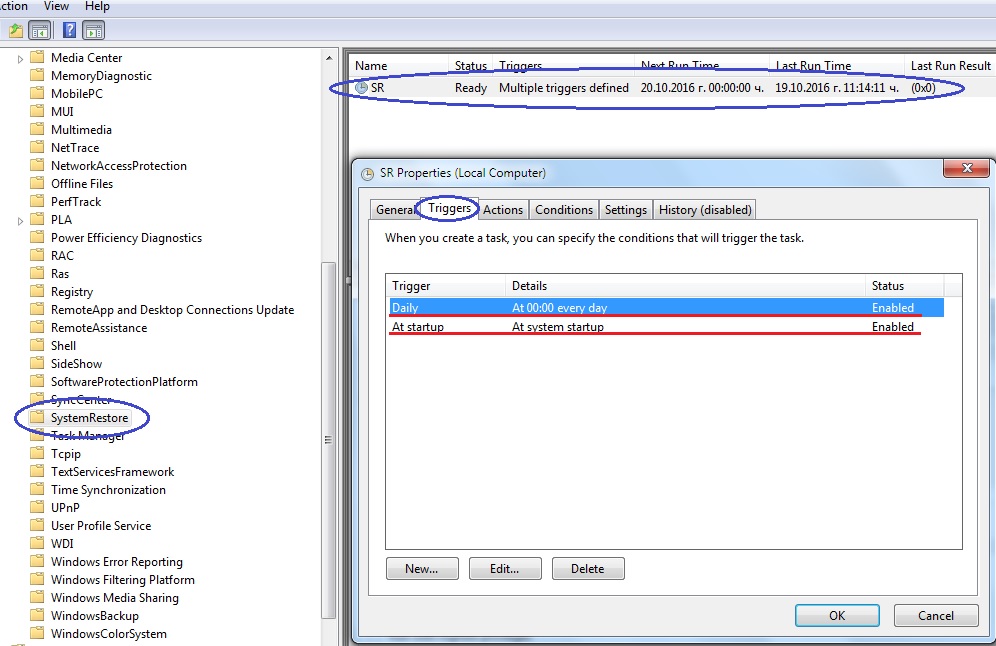
  1. In the Start Menu search field type Task Scheduler.
  2. Open the first result.
  3. In the left pane, expand Task Scheduler Library>Microsoft>Windows and then click on System Restore.
  4. In the right panel, double-click on the sigle task named SR.
  5. In the resulting window, go to the Triggers tab. If there are no triggers, click on New. If you want to change an existing trigger, double-click on the one you want to have altered.1
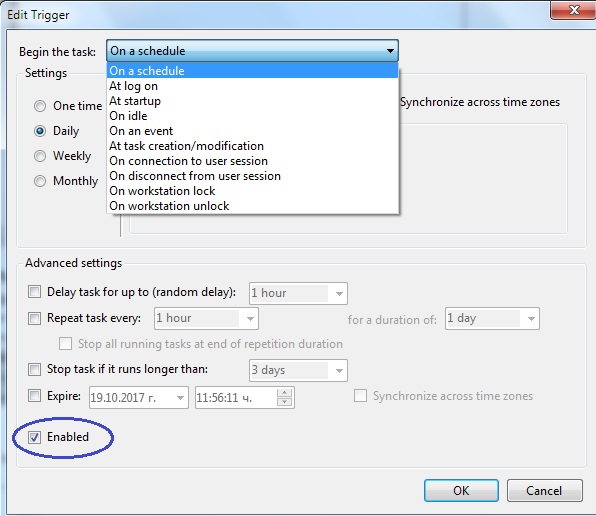
  6. By setting the trigger, you tell your PC when to automatically run the specific task, which in this case is creating a restore point. After you have created and editted the triggers to your liking, make sure to have them enabled.2

How to Use the System Restore Point

  1. In order to use a Restore Point to restore your system to a previous state, go back to System Protection in the System Properties window and select System Restore.
  2. In the resulting window, click on Next.
  3. From the list of restore points, choose the one you need, click on Next and then select Finish.

4

Need more help? Contact us in the comment section below and describe your problem in detail. We will help!

Remove Google Search Bar (Android)

In this article you’ll learn how to Remove the Google Search Bar from your Android device. These Remove Google Search Bar instructions work for all versions of Android.

Google Search Bar not working? Need it removed?

Many Android users have been asking how they can have the Google Search Bar removed from their device’s homescreen. As useful as it may be, some people would just prefer to have that extra space on their smartphone’s desktop freed for other, more regularly used icons/widgets. There are quite a few ways to remove the Google Search Bar. In this article we will cover the most common and frequently used ones, explaining their pros and cons. Just know that in some cases it might be better to just leave the search bar as it is, instead of risking causing unnecessary errors to your device or disabling any functions, that you may still want to have.

Remove Google Search Bar from Android

Dragging the widget to the top of the screen

This is probably the easiest, quickest and safest method. All you have to do is tap and hold onto the google search bar and then drag it upwards.

You should be able to see a Remove button/ icon at the top of your screen. Just drag the search bar to it and it should no longer appear on your homescreen.

8-1

Always try that method first. It is possible that you may be unable to use that method for whatever reason. However, in most cases, especially with newer Android devices, getting rid of that (or any other) widget is a piece of cake. Just use the dragging method and it should be gone in no time. The Google Search will still remain on your smartphone in case you ever need it again or if you want to have the widget back on your desktop.

Disabling the app

You can use this method in case you cannot simply drag-remove the widget. However, keep in mind that by disabling the Google Search app you will also disable Google Now. If you don’t want that to happen but you still want to have the search bar removed, go to our next suggestion. If you are okay with disabling Google Now along Google Search, here’s what you need to do. Go to Settings > General > Apps > All.

1-5

1-8

2-9

Find the Google Search app and tap on in.

4

Now select Disable.

5-4

 You will be warned that if you disable the app it will disappear from your screen and you may also get unexpected errors with other apps. Tap on Yes and you should no longer have the search field displayed on your desktop.

6-5

Using a custom Launcher

A custom launcher is a tool/app that will enable you to customize your homescreen. These can be downloaded from the Google store. You may want to go for this method if our first suggestion does not work on your device and you don’t want to disable Google Now along Google Search (which will be the result from going for our second suggested method). To get custom launcher simply go to your smartphone’s store and search for one. There should be many alternatives, just pick the one that appeals to you the most.

Screenshot_2016-05-14-19-27-14[1]

You may want to check it’s reviews as well. Download/install the app and then launch it. Now you can customize your homescreen at will. With most custom launchers all you’ll need to do so as to have the search filed removed is to go to the desktop settings and set the entry for persistent search bar to None.

Additional option for rooted devices – installing a custom ROM

A rooted smartphone generally gives you quite a few extra customization options for your device. Basically, having a rooted android phone is similar to being able to use an Administrator account on a Microsoft computer. It’s just that smartphones don’t have a built-in way for users to access that root account. Therefore, it requires a bit of extra skill and knowledge so as to root your device.

The method for removing the google search bar in this paragraph is applicable only for rooted devices. If you don’t have access to your smartphone’s root account, you may want to go back to our previous suggestions. For those of you who have a rooted mobile device, you can use a custom ROM to get rid of any unwanted apps and bloatware that you don’t want or need. You see, many apps (especially pre-installed ones) cannot be removed or customized on a device that has not been rooted. For example, if our first suggested method (drag-remove the widget) does not work on your smartphone, using a custom ROM on a rooted device will now enable you to do use our first method and simply drag the widget to the trash can. However, if you are not sure about rooting your device or using a custom ROM, you might consider either simply disabling the Google Search app or using a custom launcher.


How to Powerwash Chromebook (Reset Chromebook)

This article was created to assist users How to Powerwash their Chromebook. These Chromebook Powerwash instructions work with devices from all manufacturers.

Just as it is with most digital devices that we use nowadays, Chromebook computers may too require a factory reset once in a while and that is why we want to teach you How to Powerwash Chromebook devices.. To be exact, the term used to describe a factory reset when it comes to chromebook computers is Powerwash. Powerwash-ing your laptop is similar to resetting your android device to its factory state or re-installing your Windows OS. Now, you might be wondering why you would want to factory rest your chromebook laptop. Well, a powerwash is usually recommended when there’s some problem with your laptop’s behaviour – slow-down of its productivity, instability etc. These are often caused by poor programmed software that you download from the internet. If your computer gets filled with programs that require big amounts of system resources your laptop may become slower and unstable. Think of powerwash as a rejuvenation for your chromebook. It will delete all changes that you’ve made to your laptop. Applications, browser extensions, plug ins etc. will all get uninstalled and deleted. Since the latter are the most common causes of malfunction among chromebooks, a powerwash will likely fix any issues that you may have with your laptop. Besides, a powerwash tends to speed-up your machine since it gets rid of everything that may have been needlessly slowing it down.

How to Powerwash Chromebook

  1. Locate an options menu at the lower right corner of your laptop and click on it. From that menu select Settings.
  2. Now scroll down until you reach Show advanced settings – click on that.
  3. Yet again, scroll down and look for a section labeled Powerwash. In that section locate the button named Powerwash and click on it.
  4. A message will pop-up telling you that you first need to restart your laptop so as to proceed forward. Click on Restart.
  5. After your chromebook re-boots a warning will be displayed to you, telling you that any data stored locally on your laptop will be deleted. Note: Here, we advise you reconsider whether you have anything valuable stored on your chromebook and if you do, make a back-up of it so you won’t lose those files. After you’ve made sure everything is secured, and no important data will be lost, you can proceed with the process by clicking on Reset. All you need to do now is wait. The process will surely take some time so be patient – do not shut-down your computer during the powerwash because this can heavily damage your system.

Once it’s all over, you can customize your Chrome OS settings and begin using your refreshed laptop. Keep in mind that it might be a good idea to powerwash your chromebook once in a while to keep it running to its full potential. Just always make sure that your important files have been stored somewhere where they won’t be affected by the factory reset. Most users use their cloud for that purpose, but if you want to reassure yourself that everything has been safely backed-up, you may also use a portable hard-drive or a flash memory as a back-up storage place.

Edge browser is crashing after Windows 10 Build 14942 update. Microsoft releases a fix.

Edge browser is crashing after Windows 10 Build 14942 update. Microsoft releases a fix.

294_news_dowser_image1

The latest preview build 14942 for Windows 10, that was released by Microsoft last Friday, came with a couple of new features. Most of them were just minor and there were not many fixes for some of the known issues – only one issue was listed. However, as it often happens, users have faced a few more bugs that need to be fixed with this release. There were problems related to the Xbox Live, where users were having trouble signing in. One of the major issues that surfaced, however, was the crashing of the Microsoft Edge web browser. After the release of build 14942, many people reported sudden shut downs of the popular Edge browser that Microsoft is trying to promote with Windows 10.

 A few hours later, the company confirmed that there might be some issues with the work of the browser and it has been added to the list of known issues. Here is how they explained the origin of the crashing problem with Edge:

 “Due to a recent platform change, Microsoft Edge may crash after launch, or when you type in the address bar or try to open a new tab.”

Generally, these are the most common ways that one would want to interact with the Edge browser and the inconvenience it causes may really be preventing users from browsing the web normally.The good thing is that the company reacted quickly to this issue and offered a fix that will solve the crashing problem. The following command was released, which needs to be run in PowerShell in order to eliminate the bug:

Get-ChildItem ‘HKCU:\Software\Classes\Local Settings\Software\Microsoft\Windows\CurrentVersion\AppContainer\Storage\microsoft.microsoftedge_8wekyb3d8bbwe\Children’ | foreach{Remove-Item $_.pspath -Recurse}

However, before you apply it, you should be warned that if you use this solution, it may delete your cookies and browsing history. But, after all, this is the risk that comes with using Windows 10 preview builds, which naturally come with some great new functionality as well as some problems.

Another possibility to eliminate the problem with Edge browser is to downgrade to the previous build. However, it too has its set of issues and having in mind that Microsoft has already offered a workaround solution for this bug, it is expected that the new build, which is hopefully coming down to the Fast ring this week, will surely eliminate the Edge crashing issue.


New Microsoft patent based on biometric data will ensure your lock screen privacy.

Biometric data will be used to protect personal info on your lock screen.

Microsoft Research Institute to WIPO (World Intellectual Property Organization) has recently published a new patent application, which could ensure your privacy and security by optimizing your lock screen. This is possible with a new biometric security technology that identifies what personal data to be revealed or hidden from the eyes of a stranger that may be using the device.

Lock screens may sometimes be accessed by anyone. This may cause some inconvenience and expose the user’s private data to a pair of curious eyes or even to some data violation risks. However, Microsoft is working on a solution that may optimize the amount of actionable and personal information that the operating system can provide, depending on who is using it. With the implementation of the new biometric security mechanism, the users will have no need to worry about the information that is shown on their home screen. This may put an end to the embarrassment and the need to choose between productivity and privacy on their screen.

291_news_dowser_image1

The Microsoft’s patent called “SELECTIVELY PROVIDING PERSONAL INFORMATION AND ACCESS TO FUNCTIONALITY ON LOCK SCREEN BASED ON BIOMETRIC USER AUTHENTICATION” will use a technology based on biometric data in order to authenticate the user who has activated the device.

The operating system that is using this method will intelligently decide whether to display more or less sensitive information, according to the level of identification of the user. More system functions and access to different information will be enabled accordingly, based on this advanced unlocking mechanism, which will be able to identify its owner.

An exact authentication won’t be needed for users to be allowed to interact with the lock screen; however, more and more information will be revealed to the user, in case that the operating system identifies it as the owner. According to Microsoft researchers, this new function will enable the lock screen to be a more practical desktop replacement. Features like sticky notes and the digital assistant Cortana may be included as additional functionality as well.

For this new biometric authentication to work, however, Microsoft will need to come up with more sophisticated and reliable unlocking mechanisms. Technologies like facial recognition and other advanced identification methods, collecting biometric data obtained from one or more biometric sensors, would need to ensure that the operating system does not unlock itself automatically, once it detects a user. However, whether and how exactly this will be implemented is yet to be seen.

The readers who are interested may check the link here to view the full content of the Microsoft Research Institute to WIPO patent.

What do you think? Would you welcome such change? You can share your thoughts in the comments below.

Windows 10 comes with new features for Microsoft Paint.

Microsoft is developing new features in Paint for Windows 10.

The classic Paint program, the way we all know it, will be replaced with a new Paint version in Windows 10. The Microsoft team is working on the release of an updated and more functional version packed with new features. This sounds like great news for the users, who are used to this very basic program. From simple editing to some small tasks, Paint has always been a vital part for every Windows user, but this time the Microsoft team wants to bring it to another level. With its improvements, the new version of Paint may easily be placed next to the other serious graphic editors available online.

The new Microsoft Paint for Windows 10 comes with 3D support.

The news about the new version of the program was announced recently by a Twitter user named WalkingCat. He released two teaser videos, in which he demonstrated the new interface of Paint and just a glimpse to some of its features.

290_news_dowser_image2

From what is visible in the videos, the well-known interface has significantly changed. A lot of the differences come from the touch and pen optimization that Microsoft inputs. Most of the icons and tools are way bigger than before and the menu bar is gone. The navigation between the tools happens through a sidebar that opens, once you click on an icon.

290_news_dowser_image1

The 3D support for objects is probably one of the best features that comes in Paint for Windows 10. This is highlighted in the video, along with some stickers and community content features as well. It is expected that with all its new functionalities, Paint will probably be even more popular than 3D Builder, which is another application that Microsoft distributes with Windows 10.

290_news_dowser_image3

Here is the Microsoft Paint Preview video itself. 

Unlike the previous versions of Windows, where Pain was a built in program, this time in Windows 10 it will be offered as an application. The release of the new version, however, will probably happen earliest in the first half of 2017, when the Windows 10 Redstone 2 update is expected to be released.
Let us know what you think in the comments below – do you use Paint? Do you like the new interface of it?

Error Code 0xC004F074 in Windows 10 Fix

This guide was written to help users solve Error Code 0xC004F074 in Windows 10 (typically with Office 2016 activation). We have provided three solutions you can try.

In case you are getting an error code 0xC004F074 while trying to activate your Office 2016 volume licensed client, then you are most probably facing an issue related to your Key Management Service. This error code usually occurs when you are trying to host the Office 2013 KMS and the Office 2016 KMS hosts on the same system. Most commonly, the Error 0xC004F074 appears if you are running either Windows 7 or Windows Server 2008 R2 on your PC. The message that you get on your screen states the following:

“The Software Licensing Service determined that the specified Key Management Service (KMS) cannot be used. Error Code 0xC004F074”

286_fixes_and_guides_image1

In some cases, this problem may occur even from a sync issue between the time and the date of the system and the server or may be related to some DNS update issue. Either way, in this guide, we are going to show you a few options that may help you solve that Office 2016 activation issue. Below, you will find detailed descriptions of the steps you need to take, so if you follow them closely, you won’t have any difficulty to fix the 0xC004F074 Error.

Error Code 0xC004F074 in Windows 10 Fix

The Guide

Option 1: Download and install latest Microsoft Office 2016 Volume license Pack

In case that your operating system is either Windows 7 or Windows Server 2008 R2 and you co-host the Office 2016 KMS host and Office 2016 KMS host, getting this error is something you could expect. This appears to be a bug that could easily be solved if you simply download and install the latest Volume License pack. This is what the Microsoft Support Team suggests as a solution to that problem. Some users have reported that this solution worked for them, so you can get the download link from here. If this doesn’t work, however, there are two more methods you can try.

Option 2: Disable and Re-enable DNS host

Error 0xC004F074 may also appear due to some DNS updating issues. In this case, if you disable the DNS publishing and re-enable it again, it may help you fix the error. To do this manually, simply follow the instructions below:

  • First, open the Command Prompt as administrator and type “Regedit
  • Next, go to HKEY_LOCAL_MACHINE\SOFTWARE\Microsoft\Windows NT\CurrentVersion\SoftwareProtectionPlatform in the registry.
  • Then, create a new DWORD Value. Name it “DisableDnsPublishing” and set its value to 1.
    This should disable DNS publishing.
  • Next, to re-enable DNS publishing you should set the value of this Key to 0 and your error should be fixed.

Option 3: Sync system date and time

A very silly but probable reason for the Office 2016 activation client error is the difference in the date and time between your client system and the server. In case of more than 4 hours of difference, error 0xC004F074 may occur. However, it has been detected that the synchronization between the client computer and the system KMS host can fix the issue. To do that, we recommend you use Network Time Protocol (NTP) as a time source. Another option to synchronize time between the client and the server on the network is to configure Active Directory Service.

We hope that the suggested solutions will help you deal with the above error. In case that you find some other solution that works, please, feel free to share it with us in the comments below. 

Microsoft is now allowing users to remove preinstalled apps in Windows 10!

Microsoft is now allowing users to remove preinstalled apps in Windows 10!

Redstone 2 users can now get rid of unwanted preinstalled apps.

An option that users have been asking for a long time now has been released with the latest update of Windows 10. It looks like apart from the many new features and optimizations that come along with the Windows 10 builds, Microsoft is also working on the user’s ability to customize the functionality of the new operating system. The latest build, released on the fast ring, comes with a useful improvement that now provides an option for users to remove more of the applications that come preinstalled with Windows 10.

This important functionality has been revealed by OneNote Central in a tweet post. The fast ring insiders can now easily remove the unwanted apps from the Settings menu by selecting “Apps & features” and clicking on “Uninstall”. There, all they have to do is select the applications they wish to uninstall and simply press the uninstall button.

288_news_dowser_image1

However, not all preinstalled apps can be removed at the moment. The good thing is that it appears that Microsoft is working on providing that important option for more apps. Hopefully, we will see them in the coming updates. The news about the Uninstall option was greeted by the Windows 10 users as a welcomed change, which will now enable them to get rid of the apps that they are not using anyway.

Another good thing is that the removed apps will not be reinstalled anymore when major updates and new builds are released. This means that once users remove a specific application, it will not come back when the OS is updated, until they manually restore it in their system. This functionality, which was implemented in build 14926, will most probably be included in the final Redstone 2 update, which is expected to be released in the spring of 2017 for retail users.

This is what Dona Sarkar, the head of the Windows Insider program, confirmed a few weeks ago:

 “We’ve heard your feedback, and starting with Build 14926, when your PC updates it will check for apps that have been uninstalled, and it will preserve that state once the update has completed. This means if you uninstall any of the apps included in Windows 10 such as the Mail app or Maps app, they will not get reinstalled after you update to a newer build going forward”.

The next thing that is expected in the future builds of Windows 10 is for Microsoft to enable the uninstall option for all stock applications. This will be a welcomed functionality for many Windows 10 users, which will improve the overall user experience with this operating system.


Video Tdr Failure Atikmpag.sys BSOD Fix (Windows 10/7)

This guide will help you troubleshoot the “Video_Tdr_Failure (atikmpag.sys)” BSOD. This error can occur on Windows 10 and earlier versions.

The source of this problem usually represents an incompatible or corrupt graphic driver. You might face such an issue if you have recently upgraded your system or you have just updated your drivers. What’s good about this situation is that usually you are given the name of the file, which is causing the BSOD error “Video_tdr_failure”. In this way you have a clear idea of where your problem has appeared. The particular driver we’ll be elaborating on in the paragraphs below is an AMD driver called atikmpag.sys. 

The “Video_tdr_failure” error is usually provoked by running an automatic update or manually updating the graphic’s drivers. It is possible for such an error to also occur if you have recently upgraded your OS to Windows 8 or Windows 10. We hope that the guide below will cover all the necessary actions you need to perform in order to get this “Video_tdr_failure” error solved.

Video Tdr Failure Atikmpag.sys BSOD Fix

The Guide

First you need to:

Boot your Windows into Safe Mode. In this way only the basic graphic driver is loaded. If you don’t know how to do that check out our quick guide.

Now try the different solution written below until you get Atikpag.sys fixed!

 – Using a previous version of  your AMD Drivers

This may surprise you, however, sometimes the newest drivers may not necessarily be the best option. They might even be the root of your issue. Fortunately, we can always go with an older version of the driver, which is unable to cause any problems.

In order to do that, follow the instructions just below:
– Press and hold down the Windows key + R. Type in devmgmt.msc and select Enter.

tdr_video_1

Choose the display adapters and right-click on your AMD display adapter. Select Update Driver Software. Choose Browse my computer for driver software.

tdr_video_2

After that go with Let me pick from a list of device drivers in my computer.

tdr_video_3

Then choose an older version of your AMD driver under Model. Normally, you can see the version date next to every single one of  them. Right after that hit NextReboot your computer. See whether you still notice the failure message. What you should do next is prevent Microsoft from automatically upgrading this driver again.

Deselect the drivers for your AMD card prepared to be installed. Restart and Check. In case the error message still appears, continue with exchanging atikmpag.sys

– Change ATIKMPAG.SYS

This option represents exchanging the file in question atikmpag.sys with a new one. Here is how to do that:

Hit the Windows Key + R. In the box that appears write “C:\Windows\System32”.

Look for the location of the file called atikmpag.sys and change its name to atikmpag.sys.bak.

After that hit the Windows Key + R again. In the opened dialog, enter  “C:\ and Click OK.

Search for a directory named ATI. Inside this folder you will see a file with the name atikmpag.sy_. It can be found by writing its name in the search box.

As soon as you detect it, make a copy of that file and save it to your desktop.

Hit and hold Windows key. Push X. Enter Command Prompt (as an Administrator).

In the black window, enter chdir desktop. After that select Enter.

At that point, simply enter expand.exe atikmdag.sy_ atikmdag.sys

OR expand -r atikmdag.sy_ atikmdag.sys.

Then choose Enter. Immediately after this command is performed, make a copy of the newly created atikmdag.sys from your desktop. Then place the copy in C:\Windows\System32.

Reboot your machine. See whether the problem is still present.

In case the options above are not the exact solution to your problem, just uninstall and install your drivers again in a clean way.

Upgrading the AMD drivers and Integrated Graphics

When Windows 8 and Windows 10 were introduced, they came with a big number of possible new issues. The ones related to drivers seem to be the biggest number of all. The error we are discussing here might be caused by your AMD GPU, or by it in combination with the integrated GPU on your motherboard. (The Integrated GPU is a graphics processor unit that  is usually embedded on the motherboard of your PC)

Begin with uninstalling the drivers currently installed on your PC. Firstly, log in, then press and hold the Windows key. At the same time hit R. Write devmgmt.msc. Push Enter adapters located in the left pane.

Click two times on Display adapters.

Then rightclick on your Video card driver show by its name.

After that right click on your adapter there. Then go with Uninstall.

Select the Delete the driver software for this device. Hit OK.

Perform that process as many times as the number of the display adapters installed.

In case  AMD Catalyst™ Control Center is installed on your PC, remove it as well. Push the Windows key + R. In the dialog that you see, enter appwiz.cpl. Then continue with Enter.

A program list will be displayed, there you should look for AMD Catalyst™ Control Center. Then right-click on. After that continue with Uninstall. Follow the instructions on your monitor to uninstall it.

If you want to update any installed driver manually, you need to be aware of the model name of your system. For that purpose, hit the Windows key and hold it. Then push the R key on your keyboard. There enter msinfo32. Press Enter. The model of your system will be next to System Model. Please also pay attention to the system type as well. It will either be x64 for 64 bit or x86 for 32 bit.

As soon as you load the website, find your way to your model’s page by indicating your system model. After that simply download and install Graphic/Video drivers for your OS (Windows 10).