.Keypass Virus Ransomware Removal (+File Recovery)

[bannerTop]

Welcome to our .Keypass Ransomware removal guide. The following instructions will aid you in removing the unwanted software from your PC for free.

The Internet users are terrorized by a new version of Ransomware!

A new version of Ransomware has recently been discovered and has been in the security news headlines from the last couple of days. The name of the new danger is .Keypass – a file-encrypting virus, which uses a secret encryption algorithm to convert your most valuable files into unreadable pieces of data and blackmail you to pay a ransom if you want to access them again. The victims are usually greeted by a scary ransom message which gets displayed on their screen after the malware has encrypted the files. This ransom message contains instructions from the hackers, who insist on a fast ransom payment in exchange for a special decryption key. Basically, this is a tricky blackmail scheme – the crooks first deprive you of access to your own data and then offer to provide you with a decryption solution if you pay the money they want. The ransom sum may vary in amount and is usually requested in some cryptocurrency, typically in Bitcoins. If you have just become a victim of .Keypass and its nasty encryption, you might feel threatened about losing your most important and valuable data. However, you should not act out of fear and panic. If you want to save your PC and your data, we suggest that you first explore the alternatives you have and decide what the best option in your particular case is.

.Keypass Ransomware

How does .Keypass Ransomware work and what could you do to counteract it?

Ransomware is a vast malicious group. It contains viruses of several different types and new malware programs that fall under this category are getting released every week. However, they all are specialized in one thing – blackmailing. The representatives of this malicious group are typically very advanced computer infections, which use different tricks to enter the people’s computers. Various well-camouflaged carriers such as Trojans, legitimate looking files, software installers, email attachments, ads, links, compromised websites, spam messages and similar sketch content could get used when the hackers want to spread threats like .Keypass Rasnomware over the Internet. The contamination oftentimes takes only a single click on the malicious transmitter in order to get to your PC and, sadly, Ransomware infections usually have no visible symptoms or indications. The Ransomware usually manages to sneak inside the system undetected and immediately gets down to its malicious business. It scans the system’s drives, detects the files which belong to the most commonly used file extensions and then secretly applies a very complex encryption algorithm to each and every one of them. When the encryption process is completed, the malware generates a ransom-demanding note on the victim’s screen. It prompts the victims to pay a certain amount of money in order to receive a secret decryption key for their files.

What should you do?

The hackers who are behind the Ransomware are typically very pushy. They want you to pay as soon as possible and may use various threatening and manipulative techniques in order to make you follow their ransom payment instructions. The last thing that the crooks want is to give you enough time to research for alternative solutions. That’s why they normally set a short deadline for the payment and threaten to double or triple the required ransom if a payment is not made within the given deadline.

You, however, should carefully consider whether giving them your money will really help you get back your data and save your system from the infection. After all, you are dealing with cyber criminals whose real intention is not to help you but to extort money from you their nasty blackmailing scheme. What if they simply “forget” to send you the decryption key or what if the key does not work? Sadly, no one can tell you what may happen if you decide to follow the ransom payment instructions and no one can give you guarantee about the future of your files. You should know, though, that there is always a risk of never receiving a decryption key because the hackers may simply vanish once they get the money.

That’s why, we suggest you act smart and do something else – instead of thinking how to pay enormous amounts of money to anonymous cyber criminals, get down to business and remove .Keypass from your system (for assistance, check the Removal Guide below as well as the professional malware removal tool on this page). By doing this, you will make your PC safe for further use and will prevent any criminals from potentially accessing it. Don’t expect that your files will get automatically restored once you remove the Ransomware, though. To get them back, it is best to use available backup copies from cloud storage, external drives or copies from other devices. You may alternatively try the file-recovery steps that our team has suggested. Unfortunately, full data recovery may sometimes not be possible without full backup copies and that is the worst part of the Ransomware’s attack. Still, it’s still worth giving  trying out our suggested file restoration methods and finding out if they manage to get your files back in your particular case.

.Keypass Virus Ransomware Removal

 Here is what you need to do in order to remove a Ransomware virus from you computer.

I – Reveal Hidden files and folders and utilize the task manager

[bannerMiddle]

  1. Use the Folder Options in order to reveal the hidden files and folders on your PC. If you do not know how to do that, follow this link.
  2. Open the Start Menu and in the search field type Task Manager.
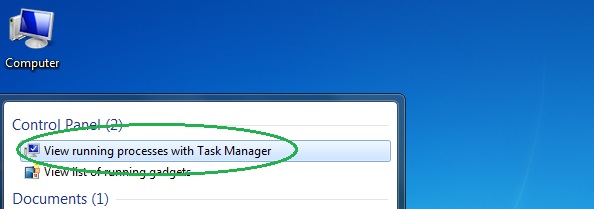
    Task Manager
  3. Open the first result and in the Processes tab, carefully look through the list of Processes.
  4. If you notice with the virus name or any other suspicious-looking or that seems to consume large amounts of memory, right-click on it and open its file location. Delete everything in there.

    [bannerMiddleSecond]

    ransomware-guide-2-pic-4

  • Make sure that the hidden files and folders on your PC are visible, else you might not be able to see everything.
  1. Go back to the Task Manager and end the shady process.

II – Boot to Safe Mode

  • Boot your PC into Safe Mode. If you do not know how to do it, use this guide/linked/.

III – Identify the threat

  1. Go to the ID Ransomware website. Here is a direct link.
  2. Follow there in order to identify the specific virus you are dealing with.

IV – Decrypt your files

  1. Once you have identified the virus that has encrypted your files, you must acquire the respective tool to unlock your data.
  2. Open your browser and search for how to decrypt ransomware, look for the name of the one that has infected your system.
  3. With any luck, you’d be able to find a decryptor tool for your ransomware. If that doesn’t happen try Step V as a last ditch effort to save your files.

V – Use Recuva to restore files deleted by the virus

  1. Download the Recuva tool. This will help you restore your original files so that you won’t need to actually decrypt the locked ones.
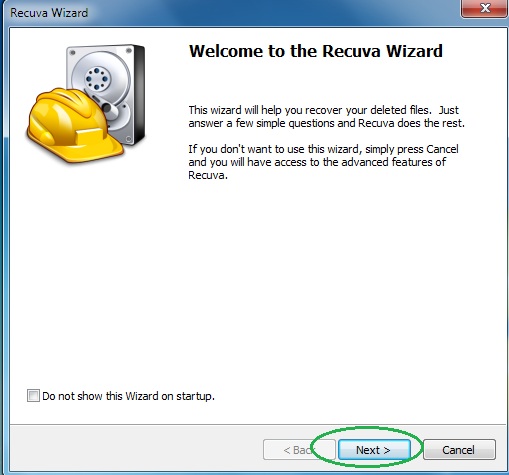
  2. Once you’ve downloaded the program, open it and select Next.
    ransomware-guide-2-pic-5
  3. Now choose the type of files you are seeking to restore and continue to the next page.
  4. When asked where your files were, before they got deleted, either use the option In a specific location and provide that location or choose the opt for the I am not sure alternative – this will make the program look everywhere on your PC.
    ransomware-guide-2-pic-6
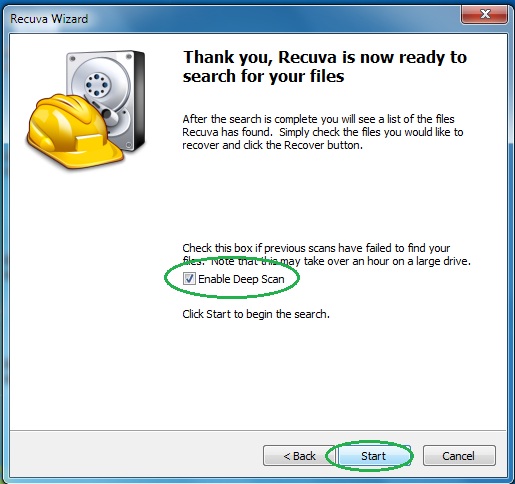
  5. Click on Next and for best results, enable the Deep Scan option (note that this might take some time).
    ransomware-guide-2-pic-7
  6. Wait for the search to finish and then select which of the listed files you want to restore.
  • Keep in mind it is possible that not all files might be fully recovered. You can check in what condition the files are from the State column in the list of deleted files.
    ransomware-guide-2-pic-8

Remove Mac Auto Fixer “Virus”

[bannerTop]

Welcome to our Mac Auto Fixer removal guide. The following instructions will aid you in removing the unwanted software from your PC.

Have you recently gotten unwanted homepage or search engine changes on your computer? Is your default browser getting you redirected to various unfamiliar domains? Are you seeing different pop-up ads, banners and new tabs, every time you open your Safari, Chrome or Firefox? If yes, then continue reading this helpful guide because here we will tell you how to quickly find an effective solution to this disturbance and locate its source. Usually, the above-described symptoms are a sure sign that there is a browser hijacker on your computer. That’s why we will focus our attention on this type of software. What is more, we will discuss the specifics of one particular representative of this software group called Mac Auto Fixer which has recently been reported to cause browsing-related issues to the users who have had it installed in their computer systems. If you have this hijacker on your machine and are unable to find an effective way to have it removed, in the text below, we have prepared a detailed Removal Guide as well as a tested Mac Auto Fixer removal tool both of which can be used for the removal of the unpleasant piece of software. The instructions there will help you uninstall Mac Auto Fixer without risk for your PC and get rid of its annoying browser changes once and for all.

A brief summary of Mac Auto Fixer and its specifics

Mac Auto Fixer is a potentially unwanted application which is often referred to as a “virus” but most of the security experts actually categorize it as a browser hijacker. This app typically operates as a page redirecting tool which lands the web users on different sponsored web locations. It is usually claimed that the purpose of Mac Auto Fixer is to enhance the browsing experience of the users and to generate the best search results. However, even though the appearance of this application is not much different from a typical browsing extension, its behavior is. Instead of showing you genuine search results, Mac Auto Fixer typically tries to redirect you to certain promoted websites, ads or sponsored links that different from the ones you actually want to visit. For this reason, this annoying software may impose some changes to its homepage domain, search engine settings or search results as tis would make its advertising campaigns more effective. It is very common for the browser hijacker to also display various intrusive ads, pop-ups, banners, new tab windows or links all over your screen during every browsing session. The idea of this action is again to expose you to some offers, goods, services or software, which needs to be promoted as well as to generate Pay-Per-Click revenue.

Most of the users find the activity of Mac Auto Fixer quite irritating and questionable which is why this application is often regarded as potentially unwanted. The number of people who want to uninstall it is quite significant and some of them even fear that this hijacker wants to harm their PC by gaining control over their Chrome, Firefox or IE browser. The truth, however, is quite different. The browser hijacking software is not a virus-like software and does not really intend to cause harm or some sort of corruption to the users’ machines. Its primary goal is to advertise which is why it is really unlikely for you to experience anything else than a browsing-related disturbance similar to what we have already described above. Unlike a real virus, (such as a Trojan horse or a Ransomware for instance), Mac Auto Fixer will not affect your data or your system processes, but only your browser. What is more, this application can be removed from the PC without any actual malicious consequences and you don’t even need to be a computer expert to do that. A simple Removal Guide or a scan with some reliable professional antimalware tool (such as the Mac Auto Fixer removal tool on this page) can help you in that. In the case of a real malware attack, however, your system may not be in a condition to be repaired so easily and you may need the assistance of a security professional.

How can Mac Auto Fixer become part of your system?

There are very many ways in which a browser hijacker may get installed on your system. However, all of them more or less require your approval (informed or uninformed). For instance, if you are regularly downloading and installing free software setups such as games, video players, audio players, browser tools updates and free extensions, this may oftentimes land you an application like Mac Auto Fixer. The annoying hijacking software typically gets bundled inside the installers of different free software packages and gets installed into the system by default when the users agree on the Automatic/Quick installation. Unlike sneaky threats such as Ransomware or Trojans which typically infect you without your knowledge, an application like Mac Auto Fixer cannot typically do that. You can easily prevent its installation and disable it from any bundle if you select the Advanced/Custom/Manual installation options and remove any related checkmarks which offer you to make this application part of your system.

Source: Howtoremove.guide’s instructions: How to remove Mac Auto Fixer “Virus” (August 2018 Update)

Mac Auto Fixer Removal

I – Safe mode and revealing hidden files

  1. Boot your PC into Safe Mode /link/
  2. Reveal hidden files and folders /link/

II – Uninstallation

[bannerMiddle]

  1. Use the Winkey+R keyboard combination, write Control Panel in the search field and hit enter.
    adware-1
  2. Go to Uninstall a program under Programs.
    adware-2
  3. Seek the unwanted software, select it and then click on Uninstall

If you are unable to spot Mac Auto Fixer, search for any unrecognized programs that you do not remember installing on your PC – the unwanted software might disguise itself by going under a different name.

III – Cleaning all your browsers

  1. Go to your browser’s icon, right-click on it and select Properties.
    adware-3
  2. Go to the Shortcut tab and in the Target make sure to delete anything written after “.exe”.
    adware-4
  3. Now, open your browser and follow the instructions below depending on whether you are using Chrome, Mozilla or IE.
  • Chrome users:
  1. Go to your browser’s main menu located in the top-right corner of the screen and select Settings.
    adware-5
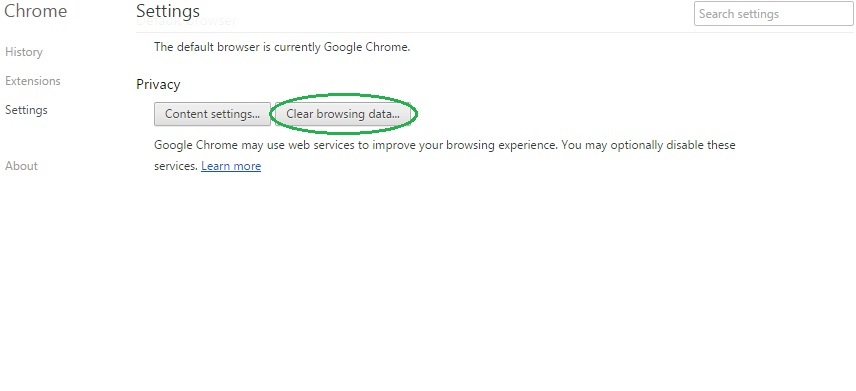
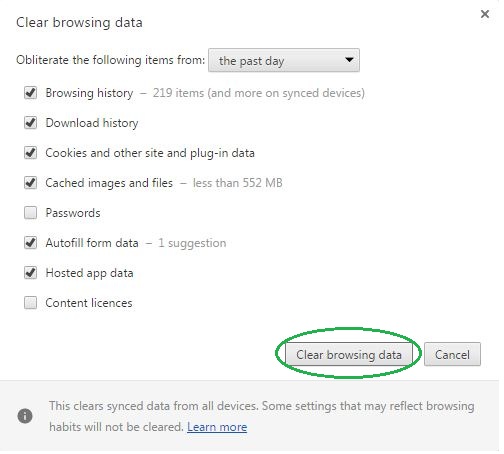
  2. Scroll down, click on Show Advanced Settings and then select Clear browsing data. Just to be sure, tick everything and clear the data.
    adware-6
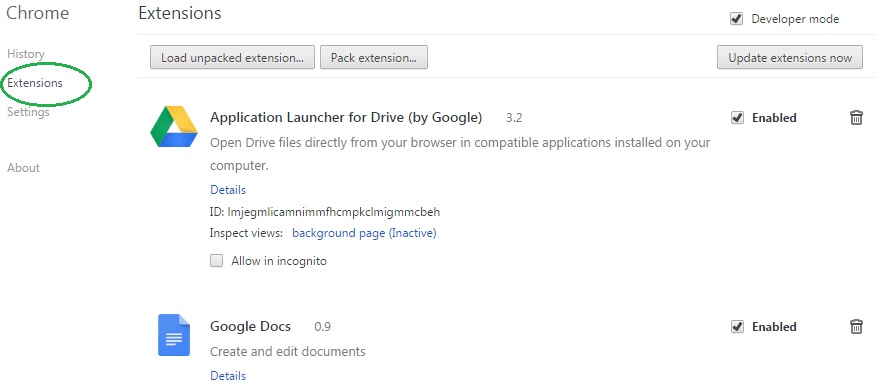
  3. Now, in the left pane, go to Extensions and look through all extensions that are integrated within your browser. If you notice any suspicious add-on, disable it and then remove it.
    adware-7
  • Firefox users:
  1. Similarly to Chrome, go to the main menu and select Add-ons and then Extensions.
  2. Remove any suspicious browser extensions that you may have even if they do not have the name Mac Auto Fixer on them.
  • IE users:
  1. Go to Tools and select Manage add-ons.
    adware-8
  2. Click on all add-on types from the left pane and check if there is anything suspicious in the right panel. In case you find anything shade, make sure to remove it.

IV – Removing Shady processes

[bannerMiddleSecond]

  1. Go to your start menu, type Task Manager in the search field and from the results open View running processes with Task Manager.
    adware-9
  2. Thoroughly look through all processes. The name Mac Auto Fixer might not be there, but if you notice any shady looking process that consumes high amounts of memory it might be ran by the unwanted program.
  3. If you spot the process ran by Mac Auto Fixer, right-click on it, open its file location and delete everything in there. Then go back to the Task Manager and end the process.
    adware-10

V – DNS check

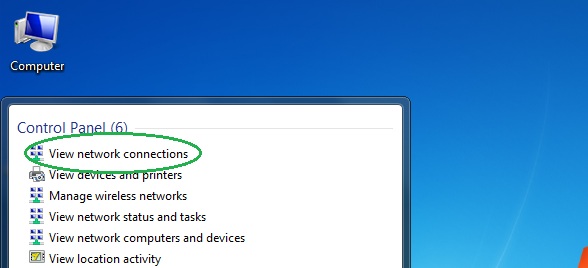
  1. In the start menu search box write View Network Connections and open the first result.
    adware-11
  2. Right-click on the network connection you are using and go to Properties.
    adware-12
  3. Select Internet Protocol Version (TCP/IPv4) and click on Properties.
    adware-13
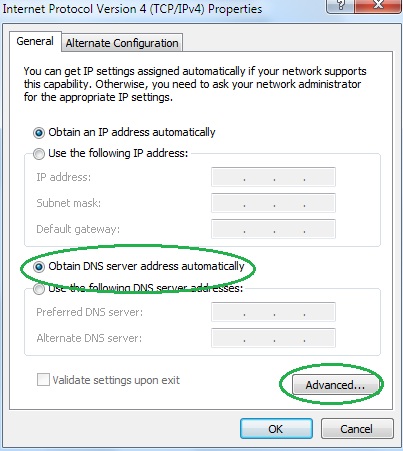
  4. If Obtain DNS server addresses automatically is not checked, check it.
    adware-14
  5. Go to Advanced and select the DNS If there is anything in the DNS server addresses field, remove it and click OK.
    adware-15
  6. Click OK on the rest of the opened windows.