Error 0x80004005 Fix (Windows 10/7)

This guide will help fix Error Code 0x80004005  “Developer Package Failed To Be Installed”. This error can occur on Windows 10 but also on earlier versions up to Windows 7, mostly commonly when you try to get Bash to work.

Recently many users around the web have experienced an uncommon error. It is actually Error 0x80004005 and it could appear as a result of a great number of possible scenarios. Such a problem is a sign that some particular extra components, which your operating system needs in order to enable additional features for debugging, have not been installed in an automatic way. Typically, you can receive the message for such an issue when you try to incorporate Bash into your system. Another possibility is while you are enabling developer mode and installing it. Apparently, no particular cause could be blamed for the appearance of error 0x80004005.

Error 0x80004005 is incapable of making your machine useless or harming it. Nevertheless, in case you have to access the developer options or Bash, such a problem could be a real pain in the neck.
Fortunately, we have assembled the most widely used and successful methods to guide you to fixing this issue in the article below. The guide should work in all cases. If you have come across another different successful solution, please share it with us. It will be great to update our list with it. Good luck!

 Error 0x80004005 Fix

The Guide

Option #1: Install the Developer Mode in a manual way

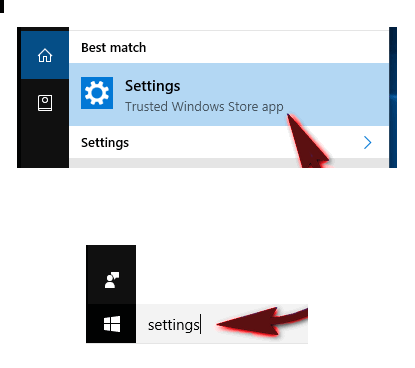
To be honest, this option is among the easiest to perform. Via the steps below you will be able to manually install the Developer Mode on your  PC. As soon as you are done with that, you will be able to go on using the features. First you need to load the Settings. You can do that either via pushing the Windows key on your keyboard or via writing Settings and after that selecting the search result with that name.

developers_1

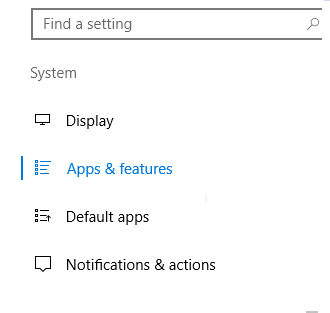
As soon as you are in, look for and enter the Apps & features menu.

Then select the Manage Optional features  that you will see at the top.

developers_2

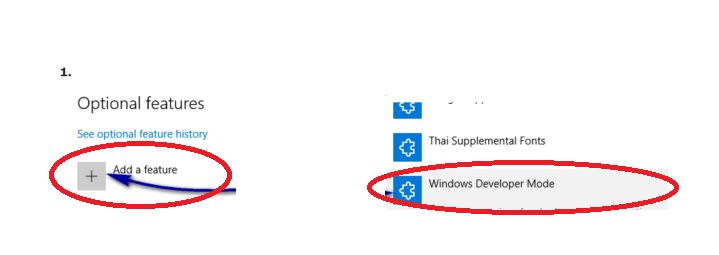
Select Add a feature. After that go with the Windows Developer Mode package. Follow the installation wizard to incorporate it into your system. After that perform a restart of the entire computer.

developers_3

As soon as you are finished, enter the Elevated Command Prompt. Do that by holding the Windows and the X keys of your keyboard at the same time. When the menu is displayed, simply choose to enter Command Prompt (Admin) from the menu.

developers_4

Type the command below when you are in:

sc config debugregsvc start=auto

developers_5

As soon as this command  has been implemented, go back to the For Developers page. Return there by hitting the Windows button of your keyboard and writing  For Developers. Don’t panic if you still receive the error code. While it may still appear, you will now be able to authorize the features that you want to use.

Option #2: Stop the UseWUServer registry key

This is the second potential solution that we are offering to you. However, if you are not experienced enough, please be cautious. Making a mistake or changing anything while within the registry could result in spoiling your OS once and for all.

Be careful and stick to the instructions below very closely. It is important that you shouldn’t skip any step. In this way you will make sure this error will be solved without causing another one.

  1. Load a Run dialogue window by pushing the Windows and the R keys at the same time. Once it has been opened, write regedit.exe. Push OK (or you can also hit Enter on your keyboard).

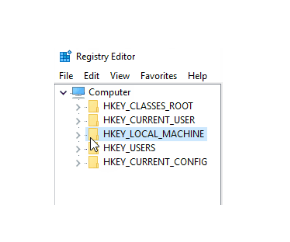
At that point the Registry Editor should load. As soon as you access it, navigate left to reach the key below:

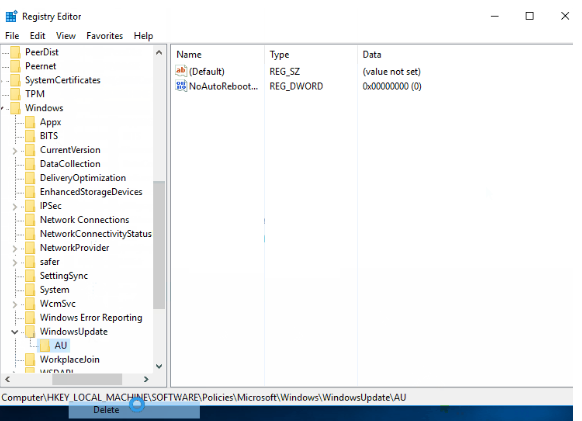
HKEY_LOCAL_MACHINE\SOFTWARE\Policies\Microsoft\Windows\WindowsUpdate\AU

Attention: Back up the to-be-edited keys before you proceed with modifying them by right-clicking on the parent folder and then choosing Export.

Modify the UseWUServer by changing its value to 0. Another option is to get rid of the entire AU folder by deleting it.

developer-mode-package-failed-to-install-error-code-0x80004005

This step should be completed in 10-15 minutes. In case you would like to make the process faster, just enter the Elevated Command Prompt (as explained in Option #1). Then apply the commands below. Don’t forget to push Enter after selecting each of them in order to execute them.

  • net stop wuauserv
  • net stop bits
  • net stop cryptsvc
  • net start wuauserv
  • net stop bits
  • net stop cryptsvc

After you have finished doing that, exit the Command Prompt. The issue shouldn’t be present after following the instructions above.

We hope our advice will help you NOT to be bothered by this error anymore.

Error 0x80070643 in Windows 10 Fix

This guide will help you fix Error 0x80070643. This error most commonly occurs when you try to update Windows 10 on your PC.

Nowadays, users everywhere around the Globe share that many of them have allegedly experienced error. 0x80070643 This issue is very common and happens to a lot of operations. It may occur when you try to install a Windows update, Microsoft Security Essentials or other various programs.  

In the article below we have pointed out several possible solutions to your issue. Please, try performing them one by one. Hopefully, some of them will help you solve your problem. In case none of them prove helpful, let us know and provide us with the details of your particular case. We will do our best to resolve your particular case. Also, if you have come across another possible solution, different from the following ones, we kindly ask you to inform us. In this way we will be able to add it to our list and help more troubled users.

Error 0x80070643 in Windows 10 Fix

The Guide

Any Windows user is aware of the fact that normally when Microsoft releases any new update, the Windows version on their machines has been programmed to check and install such updates automatically (only if the PC that needs updating has Internet access). It is very important to apply all the newest updates in order to enhance the performance of your machine and to improve your OS features. Updates could also be applied manually, once downloaded from the official provider.

Nevertheless, sometimes updating your OS may not go smoothly. The message that you may receive in case an update fails to be applied could be:

“0x80070643-Unable to install Windows Update:”

The potential origins of such an update failure could be very diverse, but the most common ones are:

  • The .NET framework on your computer could be experiencing issues.
  • The data about the MS 2003 components might be corrupted.
  • In case your OS is Windows 10 and you want to apply the KB3122947 update, it is possible that you notice a similar error code: “Update for Windows 10 Version 1511 for x64-based Systems (KB3122947) – Error 0x80070643”.
  • Maybe you are unable to apply the latest system updates.
  • Some System files or registry might have been corrupted or damaged in some way.
  • The Windows Update app is incapable of accessing particular user data.
  • Your PC is suffering from a malware infection.
  • The MSI software update registration or the .NET Framework installation has been damaged.
  • The Microsoft Office Source Engine (Ose.exe) is either disabled or corrupted.
    0x80070643_article_11

#1: Updating or fixing the Windows .NET Framework could help

.NET Framework is an essential component of the software installation process and the application of system updates for all Windows types. This feature should always be up-to-date and upgraded to the latest and the best version. In this way all the other software on your PC could be deployed, built, or simply functioning properly. The steps below will help you ensure that your system is upgraded with the newest version of .NET Framework.

– Terminate all software currently in use. Hit the “Start” button. From there go to Control Panel. From there select  Programs and open “Program and Features”.

From the group of programs that you notice, find the Microsoft .NET Framework 4 Client Profile. Click on it.  Select the tab Uninstall/Change (or Change/Remove for Windows XP users).

– A window will appear. Choose Repair .NET Framework 4 Client Profile to its original state. After that hit the Next button.

article_11_2

Choose Finish if the process of repairing process has ended. Restart your system.

At that point you should check whether the issue has disappeared by trying to install Windows updates again. If this possible solution hasn’t helped you, proceed with the ones below.

#2: Updating your PC manually might help

This possible solution has proven to help in many cases. Even if your computer skills are not close to professional, you should be able to do the task.

 – Enter Control Panel. Find the System and Security feature there. Proceed with choosing  Windows Update. Select  the  Check for Updates option and seek some available updates for your PC.

As soon as the necessary updates are detected, select “Install updates”. Doing that should do the trick and you should have solved your problem.

#3: Try rebooting the Office Source Engine (OSE) service

This solution will work if you have Microsoft Office 2003 installed on your PC and it’s necessary that you update some of its components. In this case you will see the Windows update error code 0x80070643 and its origin will be an issue with the Ose.exe file. Here comes a possible remedy.

– Hit the Windows and the R keys at the same time. This will load the Run box. Once there, enter services.msc in the search box. Press Enter.

– A list will show. Look for the Office Source Engine and click on it.

– The Startup type needs to be altered. In case you have disabled it, select to run it manually. For that purpose, click twice on it, and choose the startup type as Manual. Finish this step by hitting OK.

After that, check if you are able to install Office update.

In case the instructions above are not useful in your case, you might need to remove and install Office 2003 again.

#4: Sometimes fixing corrupted system files with SFC /scannow could be what you need for resolving this error

The majority of users have the habit of installing, updating, uninstalling and reinstalling various programs on their machines. What’s more, the system itself will perform some different tasks and operations.

Normally, during all these processes there will be some damaged or corrupted files. They may even start causing some problems and bothering the affected users. That’s why it is always beneficial to scan and look for such files. Here you may find the System file checker very helpful. This tool is an expert at searching for and detecting  corrupted files, as well as at exchanging them for the correct ones. For that purpose:

* Enter the Command Prompt as an administrator.

* Type sfc/scannow. Then continue by pressing Enter. After that a scan will begin and your corrupted system files will be fixed. Be patient until this process is completed. If the repair work has been performed without any signs of errors, check if you can apply the Windows update once more.
Please remember that sometimes file repair is not possible and you may need to complete a system restore.

#5: Solve any ongoing Registry issues

Some Windows 10 users might experience the 0x80070643 error in this form: “Update for Windows 10 for x64-based Systems (KB3081704) – Error 0x80070643”. Fortunately that can be fixed by going to registry and performing some basic operations.

*Enter Registry Editor. Select the Start button. Enter regedit in the search box. Again hit the Enter key. In case you are prompted by UAC {User Account Control}, press the YES button.

*Browse the registry using  the path below:
HKEY_LOCAL_MACHINE\SYSTEM\CurrentControlSet\Control\BackupRestore\FilesNotToBackup.
If FilesNotToBackup exists,

* Exit the editor.

Attention: For manually adding the “FilesNotToBackup”, right-click on Backup Restore. Choose New. Then continue with “Key”. After that write FilesNotToBackup and push Enter. Select the Start button so as to write services.msc . Again press Enter. Look for and find the background Intelligent Transfer Service. Double-click on it. Then proceed with hitting Start under the General tab. Choose Ok to authorize the setting. If you have set it to Start already, choose Stop. After that select Start again. You should be done now!


How to bring MagSafe back to the new MacBook Pro

Apple decided to scrap MagSafe on the new MacBook Pro, but a custom built MagSafe 2 has got your back!

BreakSafe, a custom solution from Griffin, is the successor to MagSafe.

Apple’s extreme attention to the tiniest details is one of its greatest strengths and this is what makes its users feel cared for to their greatest comfort. One of these brilliant and small, but incredibly innovative features, which makes every Mac user’s life easier, is the MagSafe. This is a tiny magnetic charging connector, which is strong enough to hold on and charge your device, but actually weak enough to safely unplug and prevent your MacBook from the possibility of getting yanked on the floor if someone manages to trip on its cable.

326_news_dowser_image2

However, in its latest MacBooks, Apple seems to be killing this amazing and convenient feature and replacing it with a standard Thunderbolt 3 connector. Indeed, the open USB-C standard gives the opportunity to charge, relay video and transfer data all through the same port, however, many users find the decision of Apple to eliminate MagSafe as a step backward from the users’ comfort.

326_news_dowser_image1

With MacBook Pro, Apple’s MagSafe is officially dead!

Fortunately, there is a solution that may replace MagSafe in the new MacBooks – Griffin now offers BreakSafe, a $34,99 magnetic USB-C cable that does almost the same job as MagSafe. Of course, it is not as convenient as the original, and the look of your MacBook may suffer a bit, since you need to plug in a separate brick that connects through USB-C. Also, you will have to check if you are connected it the right way every time, because it is not reversible like the original MagSafe. However, it can still effectively prevent your new MacBook Pro from falling on the floor and shattering into pieces should you accidentally tug the cable, so it is probably worth the investment.

326_news_dowser_image31

The devil is in the details.

Microsoft’s Surface Studio pre-orders now available!

Following temporary unavailability, Microsoft’s new Surface Studio is back in stock! 

 Pre-orders currently available, but won’t ship until early 2017.

Just a few days after the official presentation on stage, Microsoft’s new Surface Studio was listed out of stock in the Microsoft store. On the Microsoft Event held in New York City on the 26th of October, this new device was presented to the public and quickly impressed the professionals with its features, design, and creative class.

It took nearly an hour to Panos Panay to introduce the capabilities of Surface Studio – its performance, innovative functionalities, and stylish design. But what really made an impression about this device and immediately turned it into a very attractive must-have machine was the display. Its 28-inch PixelSense display is really a huge step towards the desktop and touch technology. The quality of the graphics is incomparable to other devices. Moreover, it allows any professional to express its creativity without any limits.

Thanks to the zero-gravity hinge on Surface Studio for the display, it takes only one finger to turn the monitor into a standard desktop or lay it down to become a comfortable multi-touch tablet, perfect for work and fun. Suitable for all needs, the Surface Studio specifics and available ports are not compromised as well. The device comes in three configurations, which according to Microsoft are available in limited quantities:

Surface Studio – 1TB / Intel Core i5 8GB RAM and 2GB GPU $2,999
Surface Studio – 1TB / Intel Core i7 16GB RAM and 2GB GPU $3,499
Surface Studio – 2TB / Intel Core i7 32GB RAM and 4GB GPU $4,199

All of them were listed out of stock in the Microsoft Store yesterday.

325_news_dowser_image1

The Pre-orders began on October 26th itself, and it seems that the interest for Surface Studio was so huge that all the available devices were sold out. Of course, having in mind the impressive introduction, this was expected to happen. Luckily, today the pre-order option is available again. It seems that Microsoft is acting fast in adjusting its inventory and manufacturing orders to respond to the customers’ interest.

325_news_dowser_image2

The first owners of Surface Studio may expect the Core i5 variant for shipment earliest in December and the Core i7 versions are scheduled for early 2017.

PAGE_FAULT_IN_NONPAGED_AREA Windows 10/8/7 (Guide)

This guide will help you investigate the Page Fault In Nonpaged Area Windows Error. The instructions provided work on Windows 10, as well Windows 7 and 8.

The most common reason for this BSOD (Blue Screen of Death) is a problem with your RAM or hard-drive. Memory failures can cause your machine to experience such crashes and the blue screen report would usually contain the message PAGE_FAULT_IN_NONPAGED_AREA. This generally indicates that there is an issue with your machine’s memory card. Below is a guide with some possible steps that could get this issue solved. 

Page Fault In Nonpaged Area

The Guide

It might be difficult to determine what is the exact cause of the problem. If those crashes are way too frequent, you might not have enough time to run the necessary tests in order to find the core of the problem. Therefore, we advise you to enter Safe Mode, which should provide your system with better stability, so that you can continue without being interrupted by any sudden blue screen crashes. Here is how you can boot your computer in Safe Mode.

Testing

There are a whole lot of potential causes to a BSOD crash, so it’s a good idea if you still run a few tests in order to be certain what the precise cause of the system failure is. To determine where the issue lays, we advise you to test your RAM, hard-drive and internal PC temperature.

To test your RAM, you’ll need to use a software tool developed for that purpose. There are a lot of free programs out there that will enable you to see if there is anything wrong with your RAM. One such tool that you can download online for free is memtest86. Keep in mind that this tool requires of you to create a bootable CD/USB with it in order to use it. You can learn how to create a bootable device from this article – it is focused on creating a bootable DVD/USB for operational system, but the method for memtest86 is the same.

The next thing we advise you to do is to test your hard-drive. Luckily, Windows has an integrated function that allows you to do that without the use of third-party software. Of course, you can always download some other tool that may potentially have a greater variety of options, but if you do not want to get additional software, here is how you can test your drives for any bad sectors.

  1. Open My Computer and right-click on the hard drive that you want to test.
  2. Select Properties and go to the Tools section.
    1
  3. Click on Check now.
  4. Tick both options in the resulting window and select Start.
  5. You might get a message that your PC cannot test your drives when they are in use. In that case, you can schedule a disk check the next time your PC boots – do that and restart your machine manually.
    2
  6. If any bad sectors are found, Windows will attempt to fix them.
  • It might be a good idea to check your PC’s temperature. Here, you’d once again need to get an online tool to do the job. There are a lot of them that can be downloaded for free online. Antoher example is Open Hardware Monitor. This can give you a lot of useful information about your PC’s condition apart from its temperature, that can help you determine what’s causing the BSOD crashes.
    3

Fixing

If the issue really was memory-related it might be worth opening your PC case and taking a look at your RAM sticks and hard disk. See if everything is firmly in its place and if there are any loose and slack cables or ones that are out of their sockets. If there is a bad RAM stick, you will need to have it changed. Surely, you’d have to buy a new one, however, RAM is pretty cheap and fixing this won’t cost you very much.

If during the tests you’ve found out the fault is in your hard drive, again, you’ll have to get a new one and replace the faulty disk. However, if that is the case, we advise you to first try to back-up any important files and documents that you might have stored on your PC or else they’d be lost. Therefore, if you think you have enough time between the system crashes, do back-up your personal data in order to preserve it.

In case the issue was not coming from your memory, or if you want to try other methods before replacing anything and see if they help, you can head to this article. There, you can find a couple of fixing methods that are focused on resolving software problems that may be the cause behind BSOD.


Windows Error 0x80004005 (Fix)

This guide will help you solve Windows Error 0x80004005. We have provided two separate ways in which Error 0x80004005 can be resolved.

Windows error 0x80004005 is an error, which does not relate to a specific issue and may appear due to various problems. It usually indicates that there is some problem with the installation of certain components, which the operation system needs in order to allow some additional features for debugging. Error 0x80004005 may appear when you are trying to install Bash or when you are trying to enable the developer mode. In fact, it is unspecified when such an error code may appear. The good thing is that this is not something serious and won’t prevent your devices from operating normally, but if, let’s say, you need a developer option or Bash, this error may be an issue. For those of you who are trying to install the Developer Mode, here we have prepared a guide that may help you get the Error Code 0x80004005 solved:

Windows Error 0x80004005

The Guide

Option 1: Install Developer Mode Manually

Ok, so this is the easy step from the two options that have been tested to work. If you follow the steps below, you will install the Developer Mode on your machine manually.
To do that, first, you need to open the Settings. You can either press the Windows key on the keyboard and simply type “Settings” шn the empty box or navigate to them through the menu.
280_fixes_and_guides_image1-1

Next, seek for the Apps & Features menu and open it.
284_fixes_and_guides_image2
There, you need to choose “Manage Optional features” as shown on the picture.
284_fixes_and_guides_image3

Then choose “Add a feature” and click on the Windows Developer Mode package. Press the install button and reboot your computer.

284_fixes_and_guides_image4

When the installation process is completed, you will need to press the Windows and “X” keys on your keyboard simultaneously in order to launch the Elevated Command Prompt or select Command Prompt (Admin) from the menu.

When you get inside the Command Prompt (Admin), type the following command and press “Run”.

sc config debugregsvc start=auto

Next, when the command is done, you will need to press the Windows key and type “For Developers” in the box to return to the “For Developers” page. Do not worry if the error code 0x80004005 is still there. After you have completed the above steps, you will be able to allow the features you need.

Option 2: Disable the UseWUServer registry key

The second option will require you to deal with the registry. Here you will need to be very careful when following the steps, because making a mistake inside the registry may irreversibly mess up your operating system. That’s why, please follow the instructions with great attention to detail in order to avoid any serious issues.

First, you will need to open a “Run” window. For that, press the Windows and R keys on your keyboard simultaneously.

Next, type regedit.exe in the “Run” box and press “OK”.

Now, you have entered the Registry Editor. When there, navigate with the left navigation pane to the following key:

HKEY_LOCAL_MACHINE\SOFTWARE\Policies\Microsoft\Windows\WindowsUpdate\AU

284_fixes_and_guides_image5

IMPORTANT!!!: Before making any edits to the registry, first create a backup of the keys you intend to change. For that, right-click the parent folder and select Export.

Now, after you have created a backup, you can proceed with the edits of the UseWUServer. You can delete the entire AU folder or simply set its value to 0.
284_fixes_and_guides_image6

The process should be done in some 10-15 minutes, but if you would like to accelerate it, here is what you need to do. Open the Elevated Command Prompt (the way we described in the instructions of Option 1) and use the commands below. Do not forget to press “Enter” after each one to execute it.

net stop wuauserv
net stop bits
net stop cryptsvc
net start wuauserv
net stop bits
net stop cryptsvc

When ready, just close the Command Prompt. The Error code 0x80004005 will have been fixed this way and you should not face it anymore.

How To Remove OneDrive from Windows 10 (Guide)

The guide will help you remove OneDrive from Windows 10 File Explorer. These instructions will block the OneDrive from starting and remove its shortcut from the File Explorer.

What is OneDrive?

Following the success of Google Drive Microsoft decided to create a rival product, and thus purchased One Drive. This is how OneDrive became Microsoft’s file cloud service, to which Windows users can upload their files and make them available to the public or their contacts. The files can be accessed from mobile devices or other computers using a web browser – all you need is an internet connection. The service is very useful and the use of clouds and file hosting in general is becoming ever more due to its convenience. However, not all people have the necessity of using OneDrive and other similar platforms; therefore, they see no use in it being on their computer. Being integrated with Windows 10, as well as 8.1, OneDrive is always present in the file explorer of both Windows versions much to the convenience of people who use it and to the utter annoyance of those who don’t.

intro

If you are one of the many users, who would like to get rid of OneDrive and no longer have to see it in your file explorer this can be achieved in a few very simply steps that won’t take more than a minute to complete. Simply follow them as described below and they will guide you towards removing OneDrive from Windows 10.

How to remove OneDrive from Windows 10:

The Guide

  • Please note that this guide contains editing the registry files. If you closely follow the instructions provided this is safe to use, but never delete or edit other files. We also recommend that you set up a System Restore point – just in case.
  1. Open the Run dialog box by pressing and holding the Windows Key + R.
  2. Type in Regedit.exe and hit Enter.                            1
  3. This will open the Registry Editor. In the left pane search for and click on the registry key titled: HKEY_CLASSES_ROOT\CLSID\{018D5C66-4533-4307-9B53-224DE2ED1FE6}
  4. To the right, click on System.IsPinnedToNameSpaceTree and under Value data type 0. If you are using 64-bit Windows 10, you might need to do the same for registry key HKEY_CLASSES_ROOT\Wow6432Node\CLSID\{018D5C66-4533-4307-9B53-224DE2ED1FE6 2
  5. Close the File explorer window and re-open it. The issue should now be solved and OneDrive will no longer be visible.

Please let us know if we were able to help you in the comment section below or in case you had difficulties implementing the above steps. If you have found an even better solution to hiding OneDrive, we will be more than happy to hear about it and update our guide with your fix, so please don’t hesitate to share.
HTTP Error 503 – Service Unavailable (Fix Guide)

Our guide will explain the “HTTP Error – 503 Service Unavailable” error. This error can also occur as “Error 503 Backend fetch failed”.

503

Arguably one of the most common errors people tend to encounter when browsing the Internet, it would be hard to find someone who has never seen Error 503 Service Unavailable on their screen. There are many different variations of this error, such as “503 Service Temporarily Unavailable”, “HTTP Server Error 503”, “HTTP 503”, “503 Error” and others. What they all have in common is the number 503 and the fact they basically still refer to the same thing. The 503 Service unavailable error is an HTTP status code, which is a standard response code, transited from the website’s server. Basically, it translates to the server not being available at that time. The reason why it may look as differently, as illustrated above, is purely due to whether or not the message had been customized by the specific website or the server software that transmits it.

There are two main causes for Error 503 to be appearing and they both have to do with the server of the website you’re trying to view. One reason is that the server is simply too busy and is overloaded. Another reason is that there may be some maintenance going on at that specific time. Either way, these are things your computer has nothing to with, as the problem is on the server’s side. Yes, sometimes, in very rare cases, it might have to do with your machine being in conflict with a given site, but for the most part that is very unlikely. However, even though the issue not being on your side, there are still ways to fix it, which we will show you here.

HTTP Error 503 – Service Unavailable

The Guide

Step 1: Simply try reloading the page. You can do that either by pressing F5 on your keyboard or using the Refresh button. In many cases this will be enough to have the problem solved, as the issue on the other side is usually only temporary.

Step 2: Restart your modem (router). After this, make sure to also restart your PC.

Step 3: In case neither of the above work and you have a pressing issue that needs to be addressed by accessing the website, you can try contacting the website admins. Check online for the contact details of the site you are trying to reach, there are lists available for the most popular websites and many of those have social media pages with support there to assist you, if need be.

Step 4: Wait. As pointed out earlier, the server might be overcrowded with users such as yourself. It could help if you just tried visiting the page again later, as often this is exactly the case.

Step 5: If you are encountering Error 503 on your own website, there are several other things you can try doing. For example, something may have crashed, so you might want to try and restart all running processes. Perhaps your website may have all of a sudden gained more traffic than it was intended for. Also check for things like bandwidth throttling and connection limits.

We will be glad to know if our fixes were able to help you solve your problem, so please don’t hesitate to leave us a comment below!

How to Create Bootable USB For Windows 10/7 (Guide)

Learn how to create a bootable USB/DVD for Windows using the freeware utility Rufus.

How to Create a Bootable USB/DVD

The Guide

This guide will help you create a bootable USB/DVD that you can later use to install the specific OS.

  1. Download the Windows version you want to upload on the DVD/USB from Microsoft’s official site.
    • Important: Make sure that you download the OS in ISO format or else you won’t be able to make the DVD/USB bootable.
  2. Download a burning program and install it. There are plenty of such tools online, both paid and free.
    • For our guide we will be using the program called Rufus. It can burn both DVD disks and UFD’s (USB flash drive).
  3. Burning the device: 
    1. Get a DVD disk (preferably a double-layered one) or a USB that has at least 8 GB of storage space. Just make sure that whatever you are using, it has enough space for the ISO file of the OS.
    2. Put the disk inside your DVD drive or the USB flash device inside your USB port.
    3. Open Rufus and wait until it detects the device (this should happen almost instantly).
    4. Pick the appropriate device from the drop down menu.
    5. If not already checked, place a check mark on Create a bootable disk using and set the setting next to it to ISO Image.                                                                            11
    6. Click on the disk icon next to ISO Image and find the ISO file of the OS you’ve downloaded earlier. Once you find it, click OK.
      22
    7. Recommended step: Set the file system to FAT 32
    8. Click Start and wait for the disk/USB device to be burned.

That’s it! You can also check our guide on how to use the bootable USB/DVD image to repair various problems with Windows here.

For any additional questions please use the comment section below this article. We’ll do our best to aid you, of course, free of charge!


Remove Safe Finder “Virus” (Mac and Win)

Welcome, reader, to our Safe Finder “Virus”  removal guide. The following instructions will aid you in removing the unwanted software from your PC.

You have recently been bothered by one particular problem – the Safe Finder “Virus” . This article was written with the single purpose to answer all your questions about this type of program. We will discuss everything that characterizes it as well as some efficient removal instructions. Also, we have prepared a set of prevention tips to help you avoid this kind of software once you have managed to deal with the current infection with it.

All about Safe Finder

Safe Finder belongs to the category of browser hijackers. This means that this program is perfectly capable of performing some changes to your browser. As you may have guessed from their alias, such programs usually change some of your browser’s settings. These changes may result in the appearance of many pop-ups, banner, tab and other kinds of online ads. Also, the changes in the settings may make your browser redirect you to different places online, some of which have a bad reputation and could even contain Ransomware – the worst possible malware. Another result from your new browser settings may be the change in your default homepage. These are the potential effects Safe Finder could have on your PC. There are some more probable activities this hijacker might perform, like actual research on your personal tastes based on your recent browsing requests. As a result, the ad campaign that will be showering your browser may only include ads that match these recent requests.

Does the infection with Safe Finder equal a virus infection?

Actually, Safe Finder represents a relatively harmless software product, whose only negative effect may be the fact that it could irritate you a lot. The normal types of malware that we know are focused on malicious activities such as destruction of data, encryption of data, blackmailing users, etc. Viruses are even capable of spying on you and recording you with your own web camera. Some of them might crash your entire PC. On the contrary, browser hijackers cannot do any of these. They are only specialized in promoting software, services, products and even homepages, but nothing else that could be regarded as evil.

How does such an infection with a hijacker take place, though?

Actually, browser hijackers might be found practically everywhere on the web. They are of the most widespread software in general. You may catch the Safe Finder “Virus”  from a torrent, from a shareware website, by opening a suspicious email or any email attachment. You can even get it from documents and web pages that you simply visit. Still, you are most likely to get contaminated if you download and install a free software bundle. This is a combo of software products such as hijackers, Adware and others. Developers create more and more such bundles because every single displayed ad that comes from the ad-producing software there brings more and more money to their bank accounts. Vendors truly believe that the more advertisements of a product or a service you are exposed to, the bigger the chance is to purchase the promoted goods. However, some users who get to personally know such ad-generating programs, most usually consider them unwanted or highly annoying.

The most important aspect of getting infected with the Safe Finder “Virus” that you should be aware of is the way this program actually infiltrates your system. Because you are the one who needs to let it in and most often it happens due to your carelessness or naiveté.  Whether your PC will get contaminated or not thoroughly depends on the way you are used to installing software on it. For instance, if you habitually choose the installation shortcuts by going with options like “Quick”, “Typical” or “Default”, you are more likely to end up infected because you just don’t get all the details about the given bundle. On the contrary, if you complete the installation process using the more time-consuming features of the wizard such as the “Advanced” or the “Customized” ones, you will have the chance to know about the bundle you are installing and also to choose exactly what you want from all of the programs there.

Can a future infection be prevented?

Of course, you can successfully avoid any other infection with this program in the future. For this purpose you need to pay attention to the method you use to install program bundles. Another important aspect is the anti-virus program that you have. It is necessary that it is installed properly and updated regularly. A Firewall and a nice pop-up blocker could also be helpful. Of course, you should be careful with the online addresses you go to, as well, as they may contain all kinds of cyber threats.

Our removal guide

Our removal guide below will help you clean Safe Finder from your computer. We hope that you will review the uninstallation instructions carefully and you will be able to get rid of this issue.

SUMMARY:

Name Safe Finder
Type  Adware/Browser Hijacker
Danger Level Medium (nowhere near threats like Ransomware, but still a security risk)
Symptoms  Annoying ads may compromise your browser’s behavior. It might begin to redirect your search requests to unfamiliar pages.
Distribution Method In program bundles mostly, but also through spam emails, infected torents and other hijackers. 

Safe Finder Removal

I – Uninstallation

  1. Use the Winkey+R keyboard combination, write Control Panel in the search field and hit enter.
    adware-1
  2. Go to Uninstall a program under Programs.
    adware-2
  3. Seek the unwanted software, select it and then click on Uninstall
    1. If you are unable to spot Safe Finder, search for any unrecognized programs that you do not remember installing on your PC – the unwanted software might disguise itself by going under a different name.

II – Safe mode and revealing hidden files

  1. Boot your PC into Safe Mode /link/
  2. Reveal hidden files and folders /link/

III – Cleaning all your browsers

  1. Go to your browser’s icon, right-click on it and select Properties.
    adware-3
  2. Go to the Shortcut tab and in the Target make sure to delete anything written after “.exe”.
    adware-4
  3. Now, open your browser and follow the instructions below depending on whether you are using Chrome, Mozilla or IE.
  • Chrome users:
  1. Go to your browser’s main menu located in the top-right corner of the screen and select Settings.adware-5
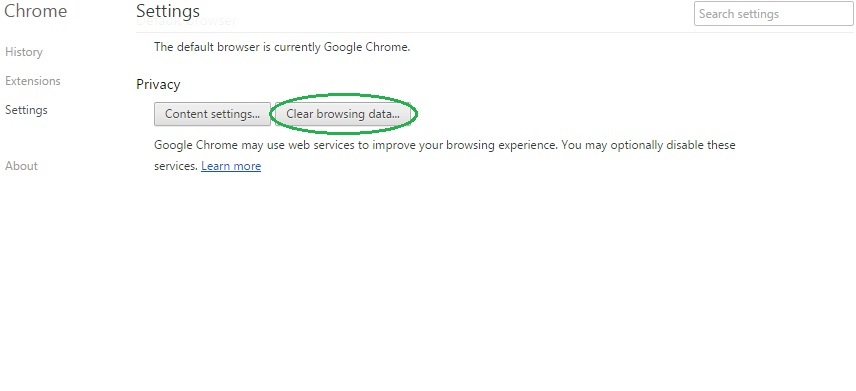
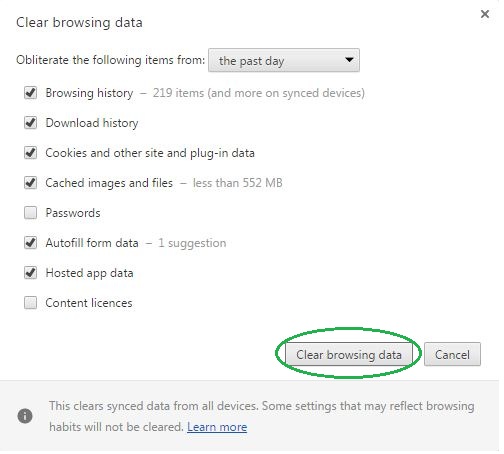
  2. Scroll down, click on Show Advanced Settings and then select Clear browsing data. Just to be sure, tick everything and clear the data.adware-6
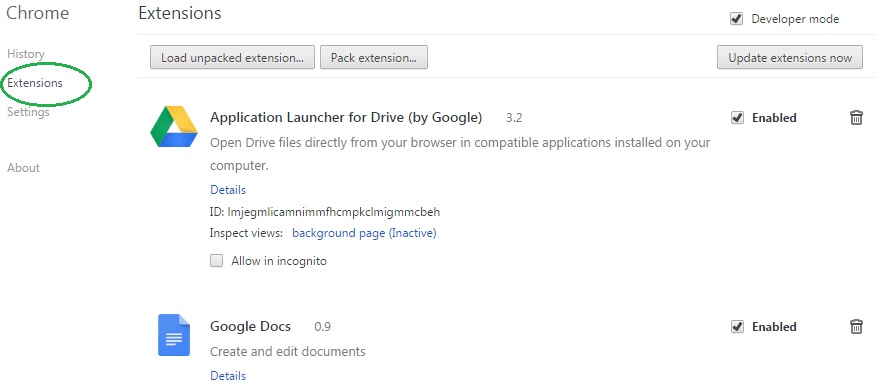
  3. Now, in the left pane, go to Extensions and look through all extensions that are integrated within your browser. If you notice any suspicious add-on, disable it and then remove it.
    adware-7
  • Firefox users:
  1. Similarly to Chrome, go to the main menu and select Add-ons and then Extensions.
  2. Remove any suspicious browser extensions that you may have even if they do not have the name Safe Finder on them.
  • IE users:
  1. Go to Tools and select Manage add-ons.
    adware-8
  2. Click on all add-on types from the left pane and check if there is anything suspicious in the right panel. In case you find anything shade, make sure to remove it.

IV – Removing Shady processes

  1. Go to your start menu, type Task Manager in the search field and from the results open View running processes with Task Manager.adware-9
  2. Thoroughly look through all processes. The name Safe Finder might not be there, but if you notice any shady looking process that consumes high amounts of memory it might be ran by the unwanted program.
  3. If you spot the process ran by Safe Finder, right-click on it, open its file location and delete everything in there. Then go back to the Task Manager and end the process.adware-10

V – DNS check

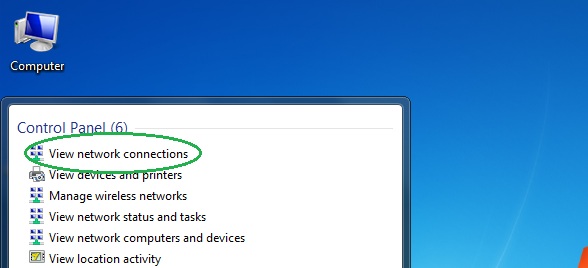
  1. In the start menu search box write View Network Connections and open the first result.
    adware-11
  2. Right-click on the network connection you are using and go to Properties.
    adware-12
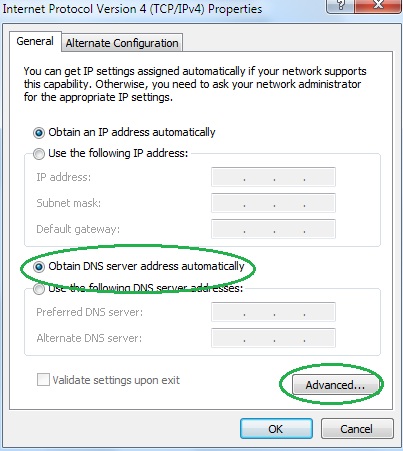
  3. Select Internet Protocol Version (TCP/IPv4) and click on Properties.
    adware-13
  4. If Obtain DNS server addresses automatically is not checked, check it.
    adware-14
  5. Go to Advanced and select the DNS If there is anything in the DNS server addresses field, remove it and click OK.
    adware-15
  6. Click OK on the rest of the opened windows.